
Loudspeakers Setup / 扬声器安装
🎤 Loudspeakers Team / 扬声器组
| Team / 小组 | Members / 成员 |
|---|---|
| Loudspeakers / 扬声器 | • Alex Jang 🔑 • Yuto Nomura • Prasert • Kittikhun |
🇬🇧 English Instructions
Purpose
Measure chair distances according to the schematics and install loudspeaker groups 1-5 for the audience, stage, and accounting/departments.
Required References
- Full Drawing Set: 📎 Complete PDF
- Specific Schematics:
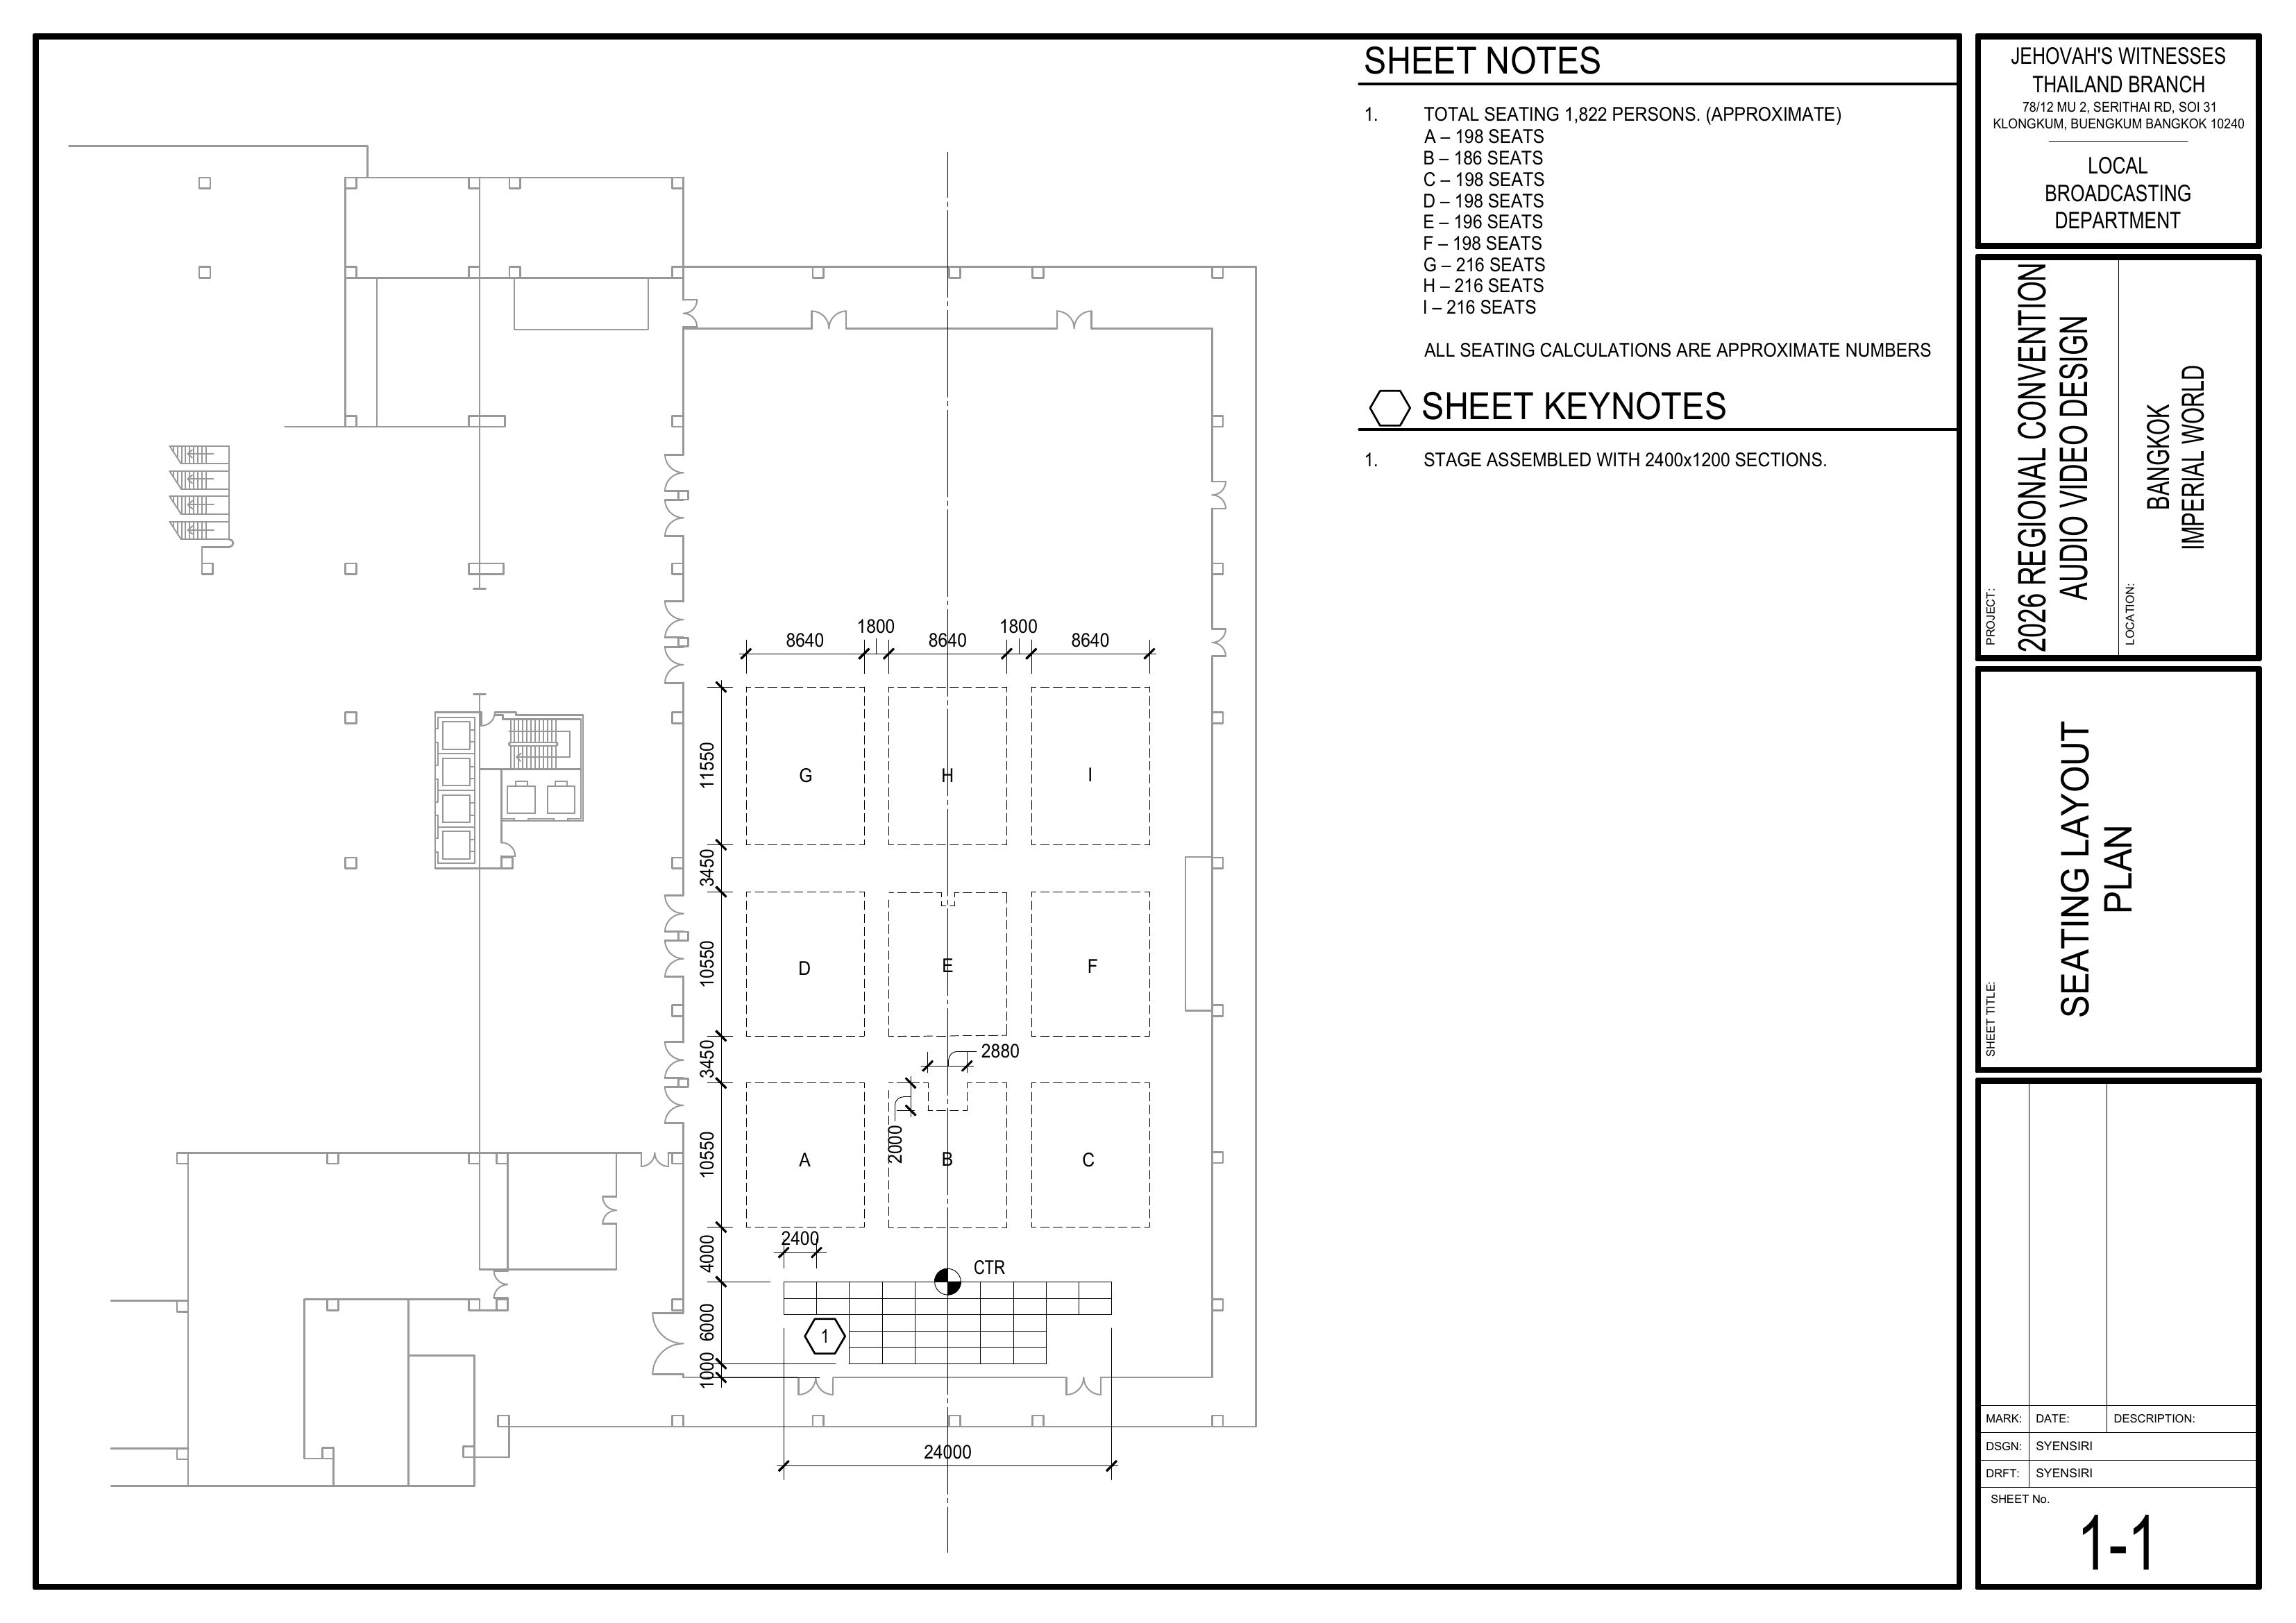
- 1-1 Seating Layout Plan
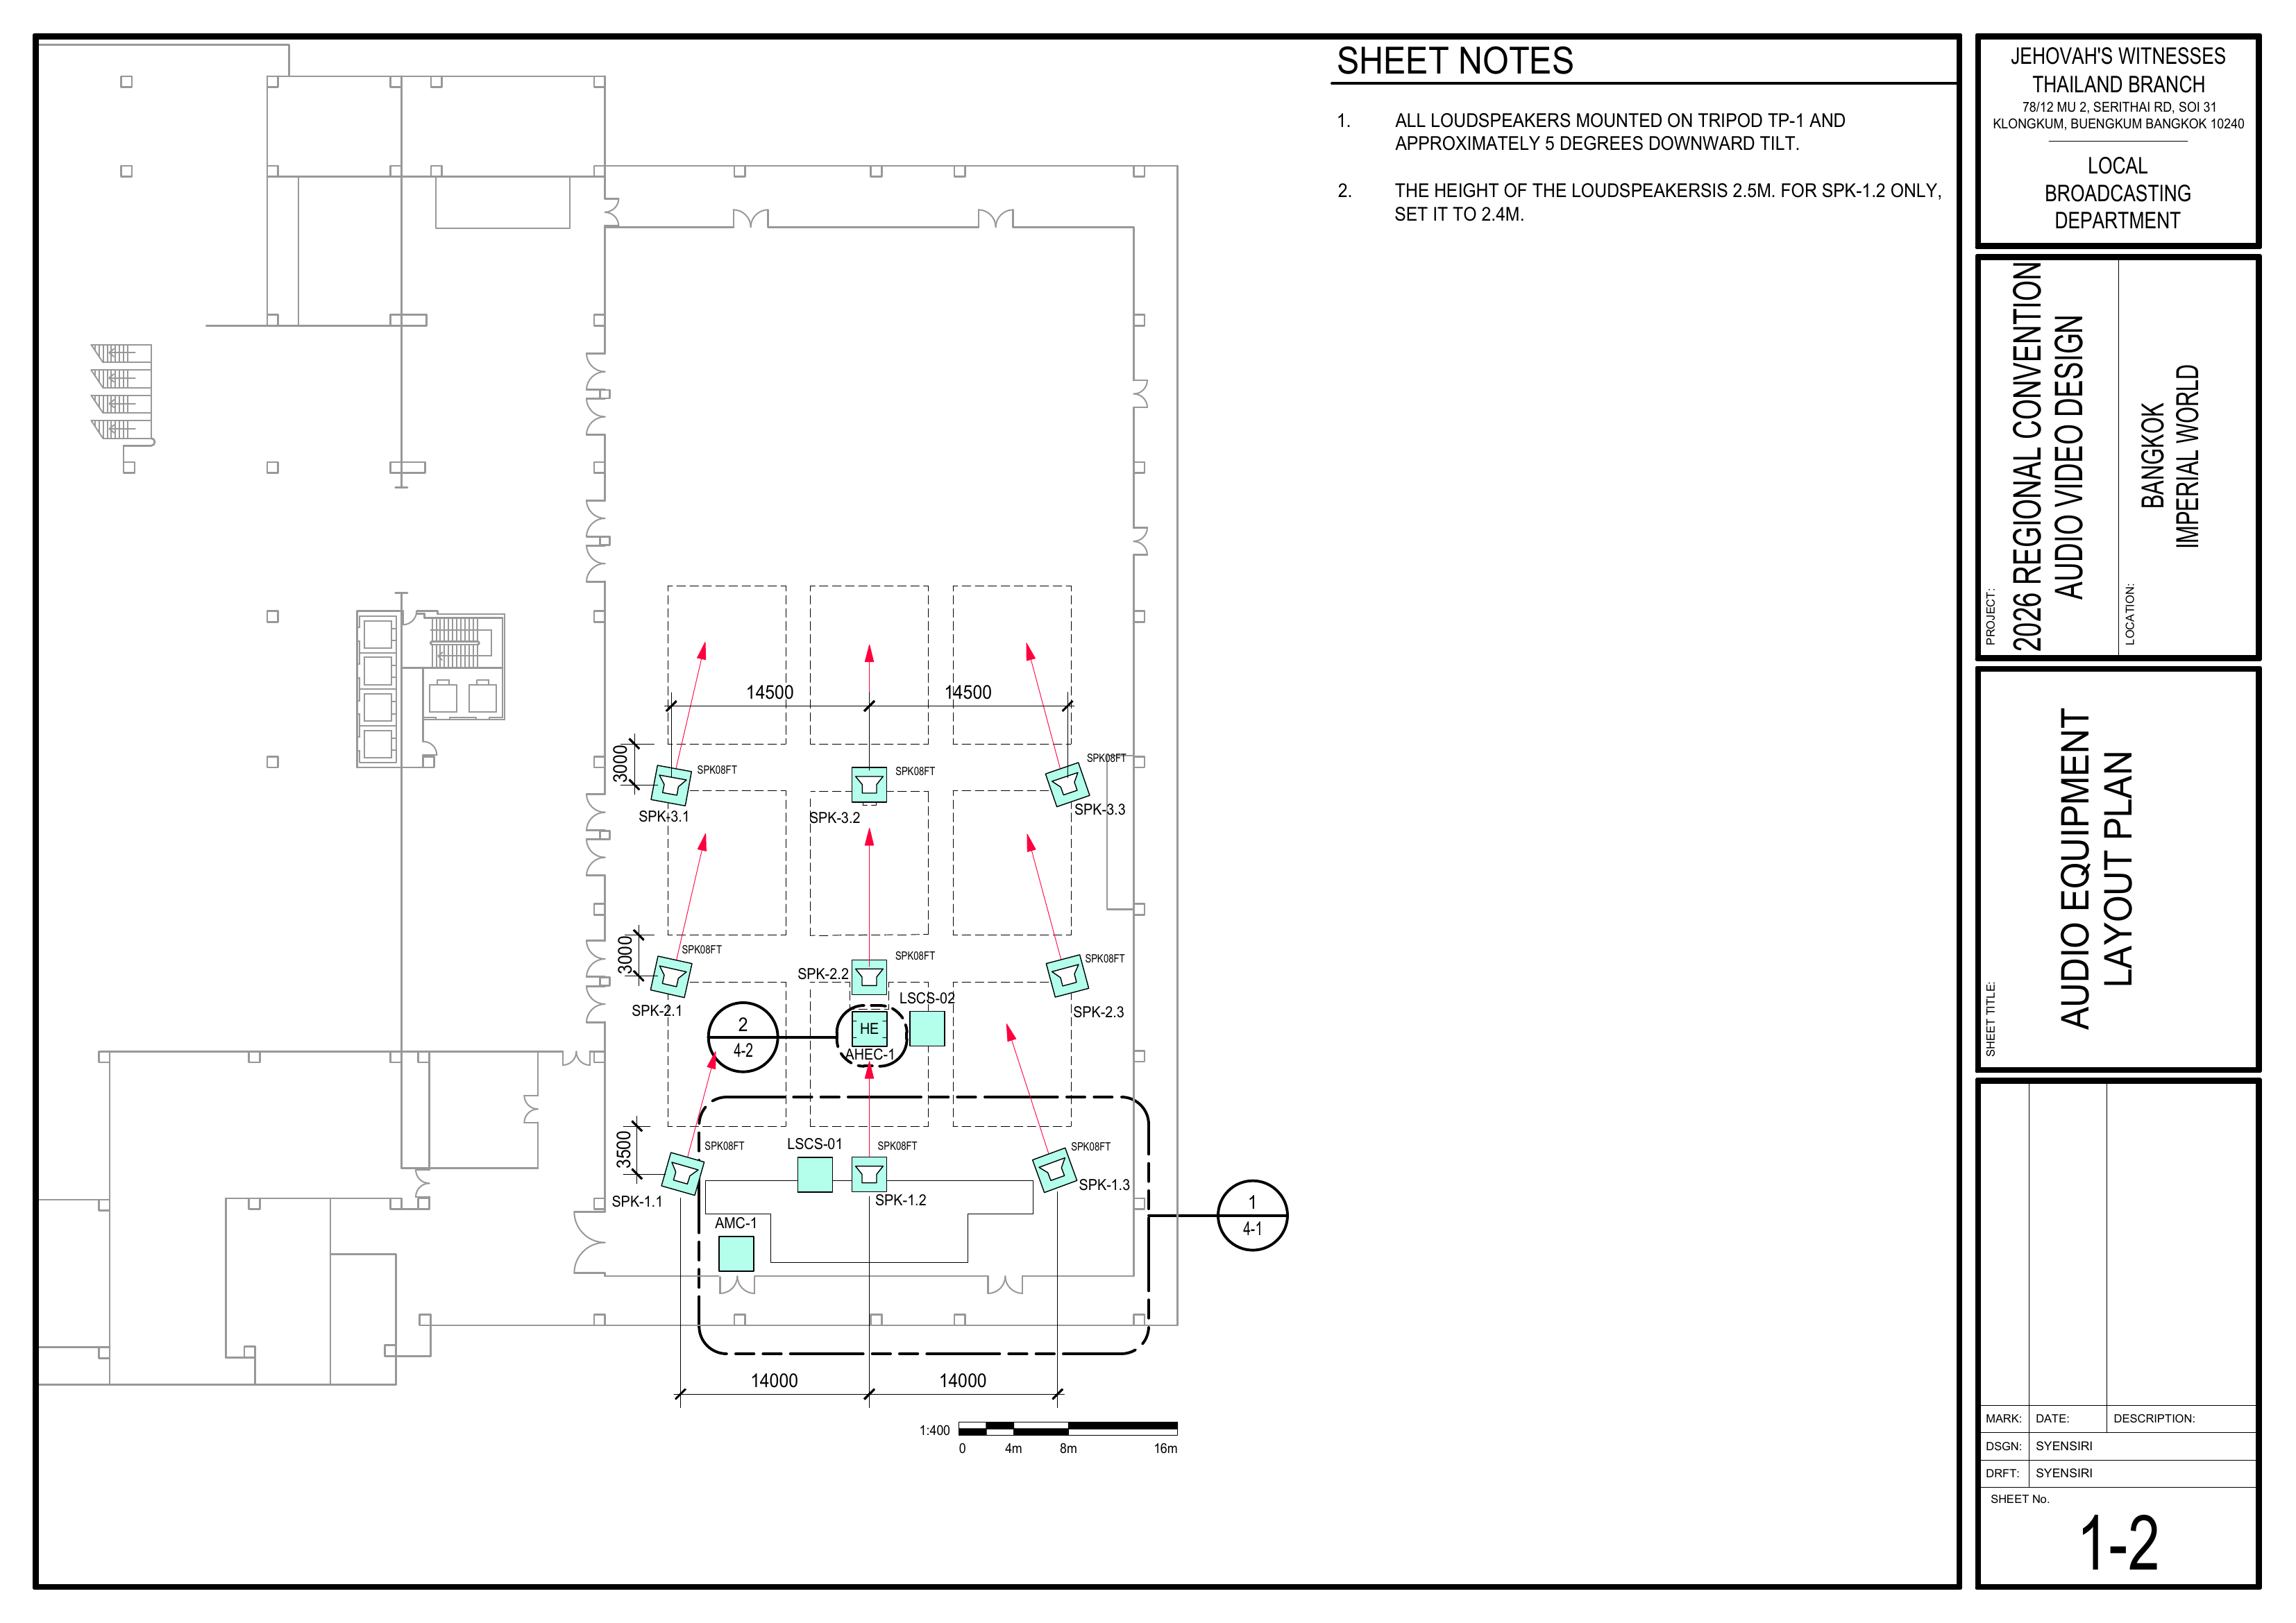
- 1-2 Audio Equipment Layout Plan
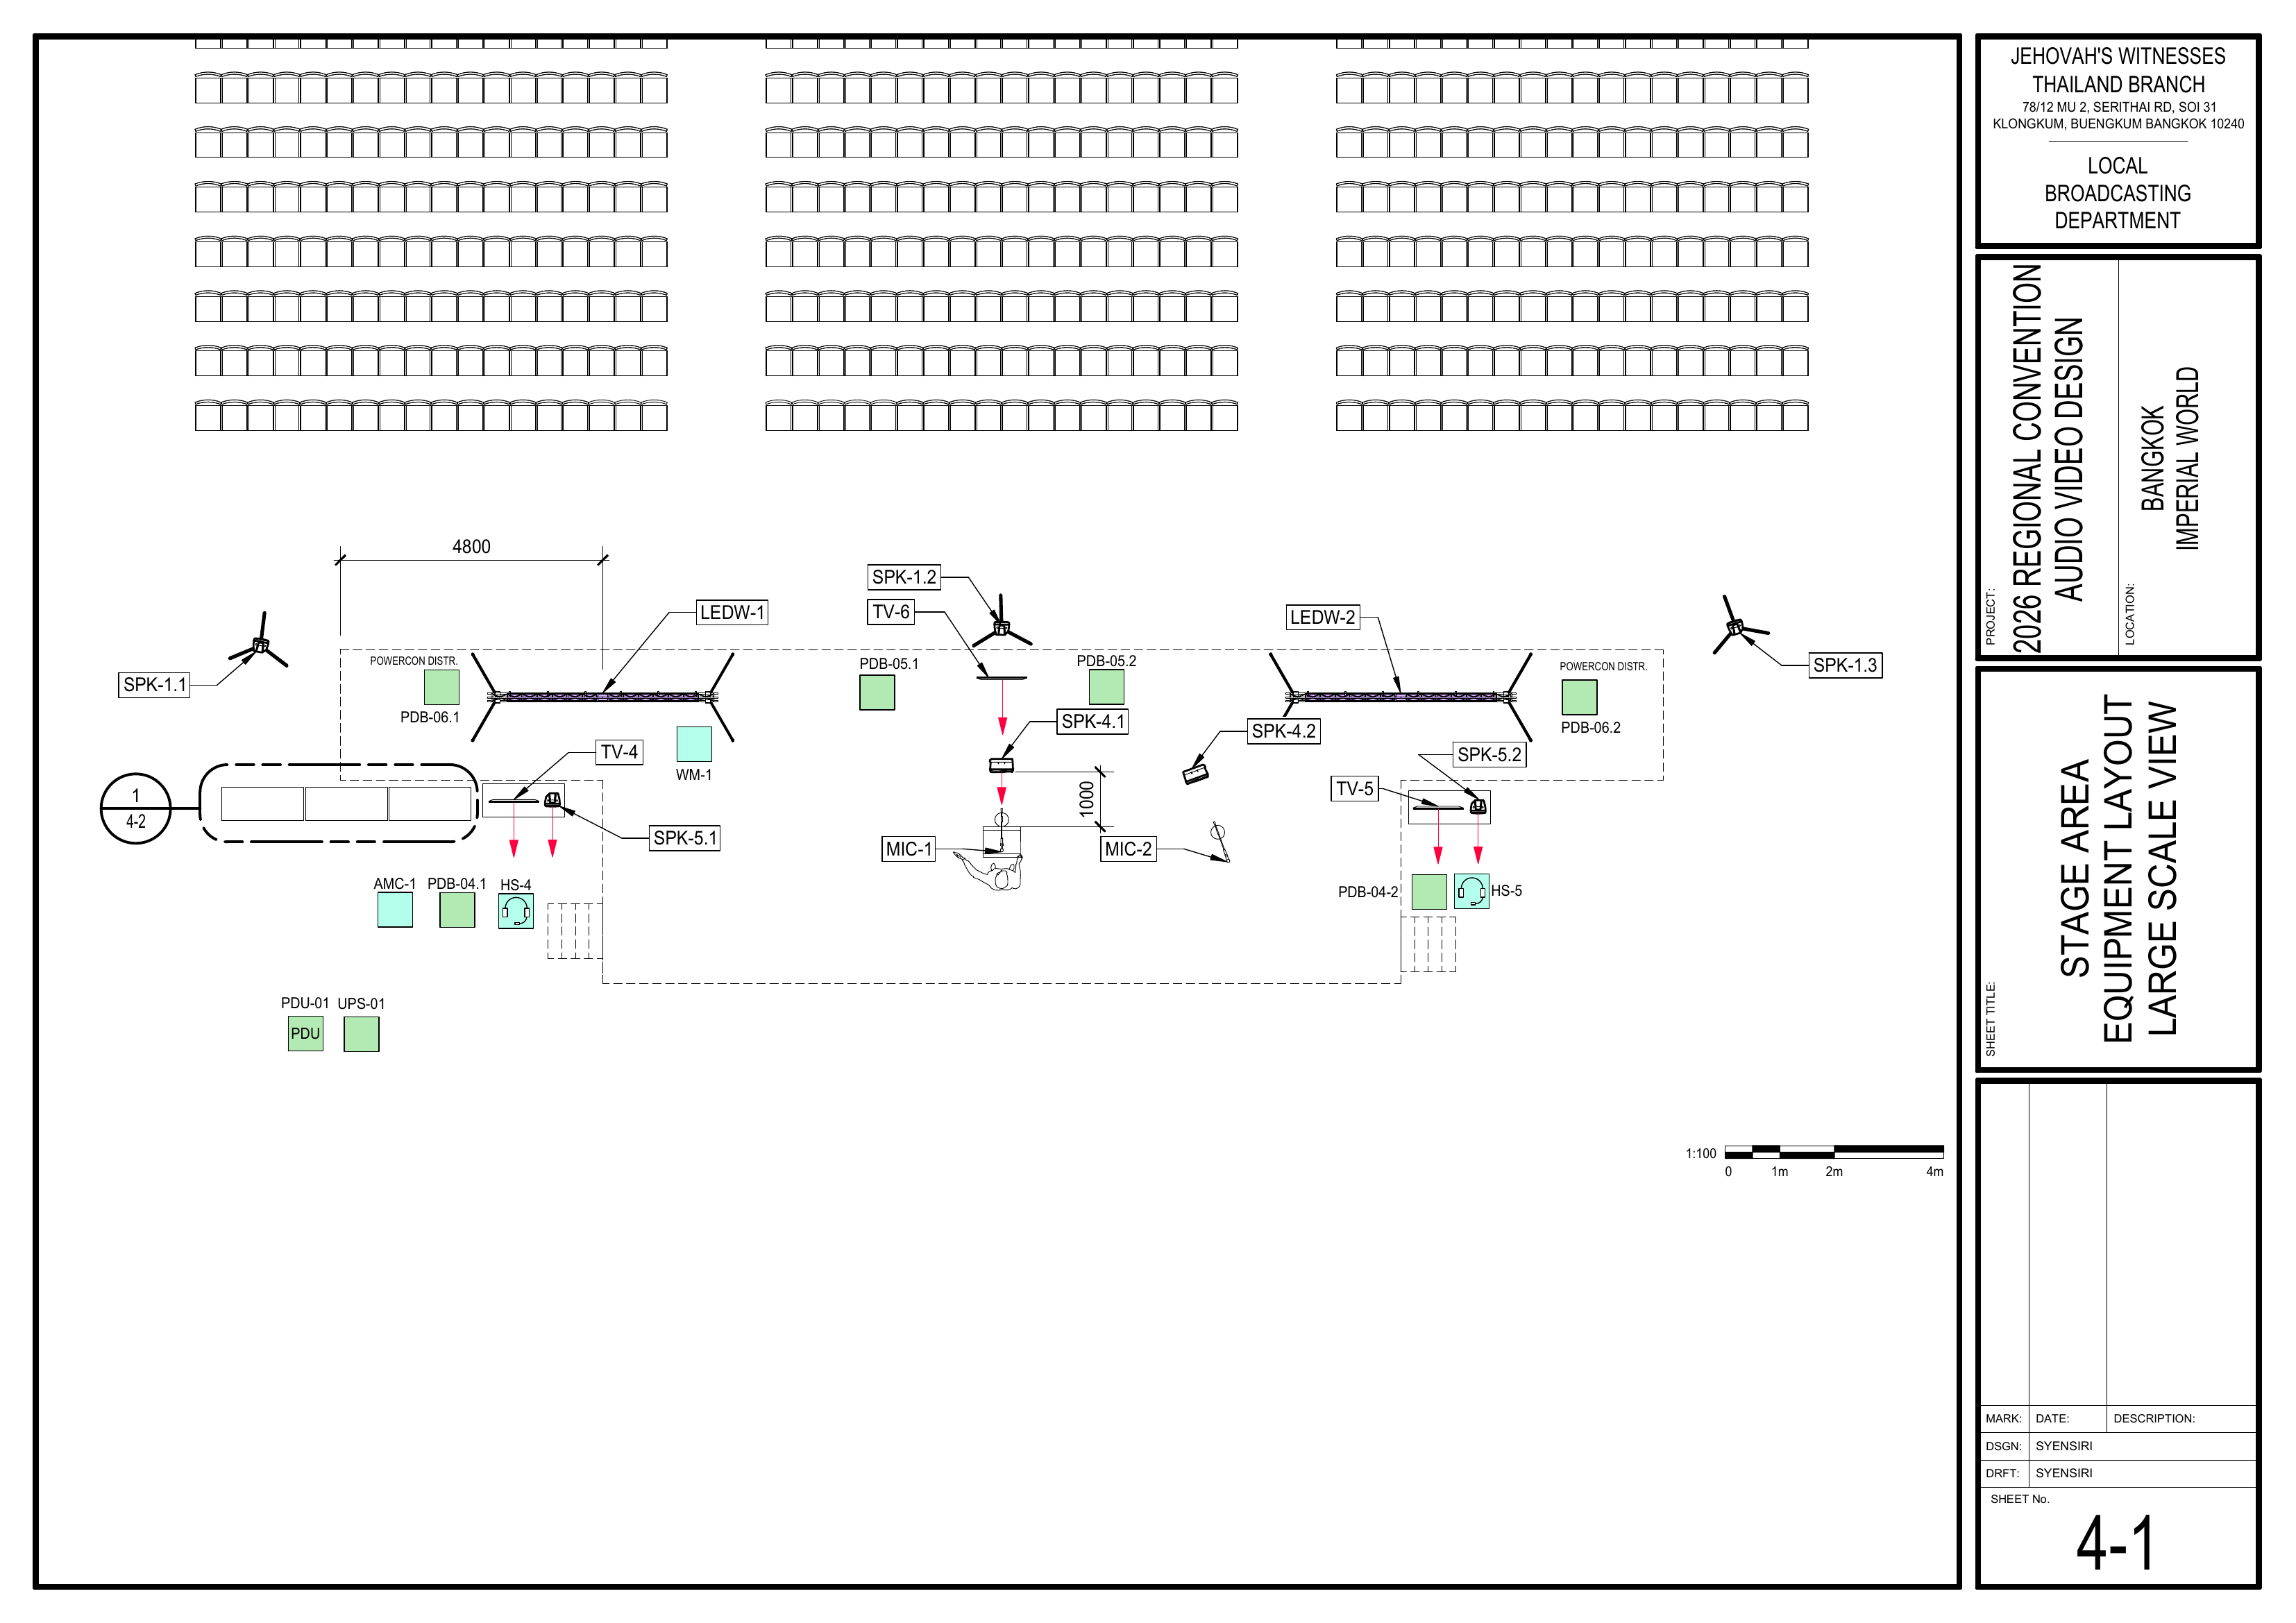
- 4-1 Stage Area Equipment Layout
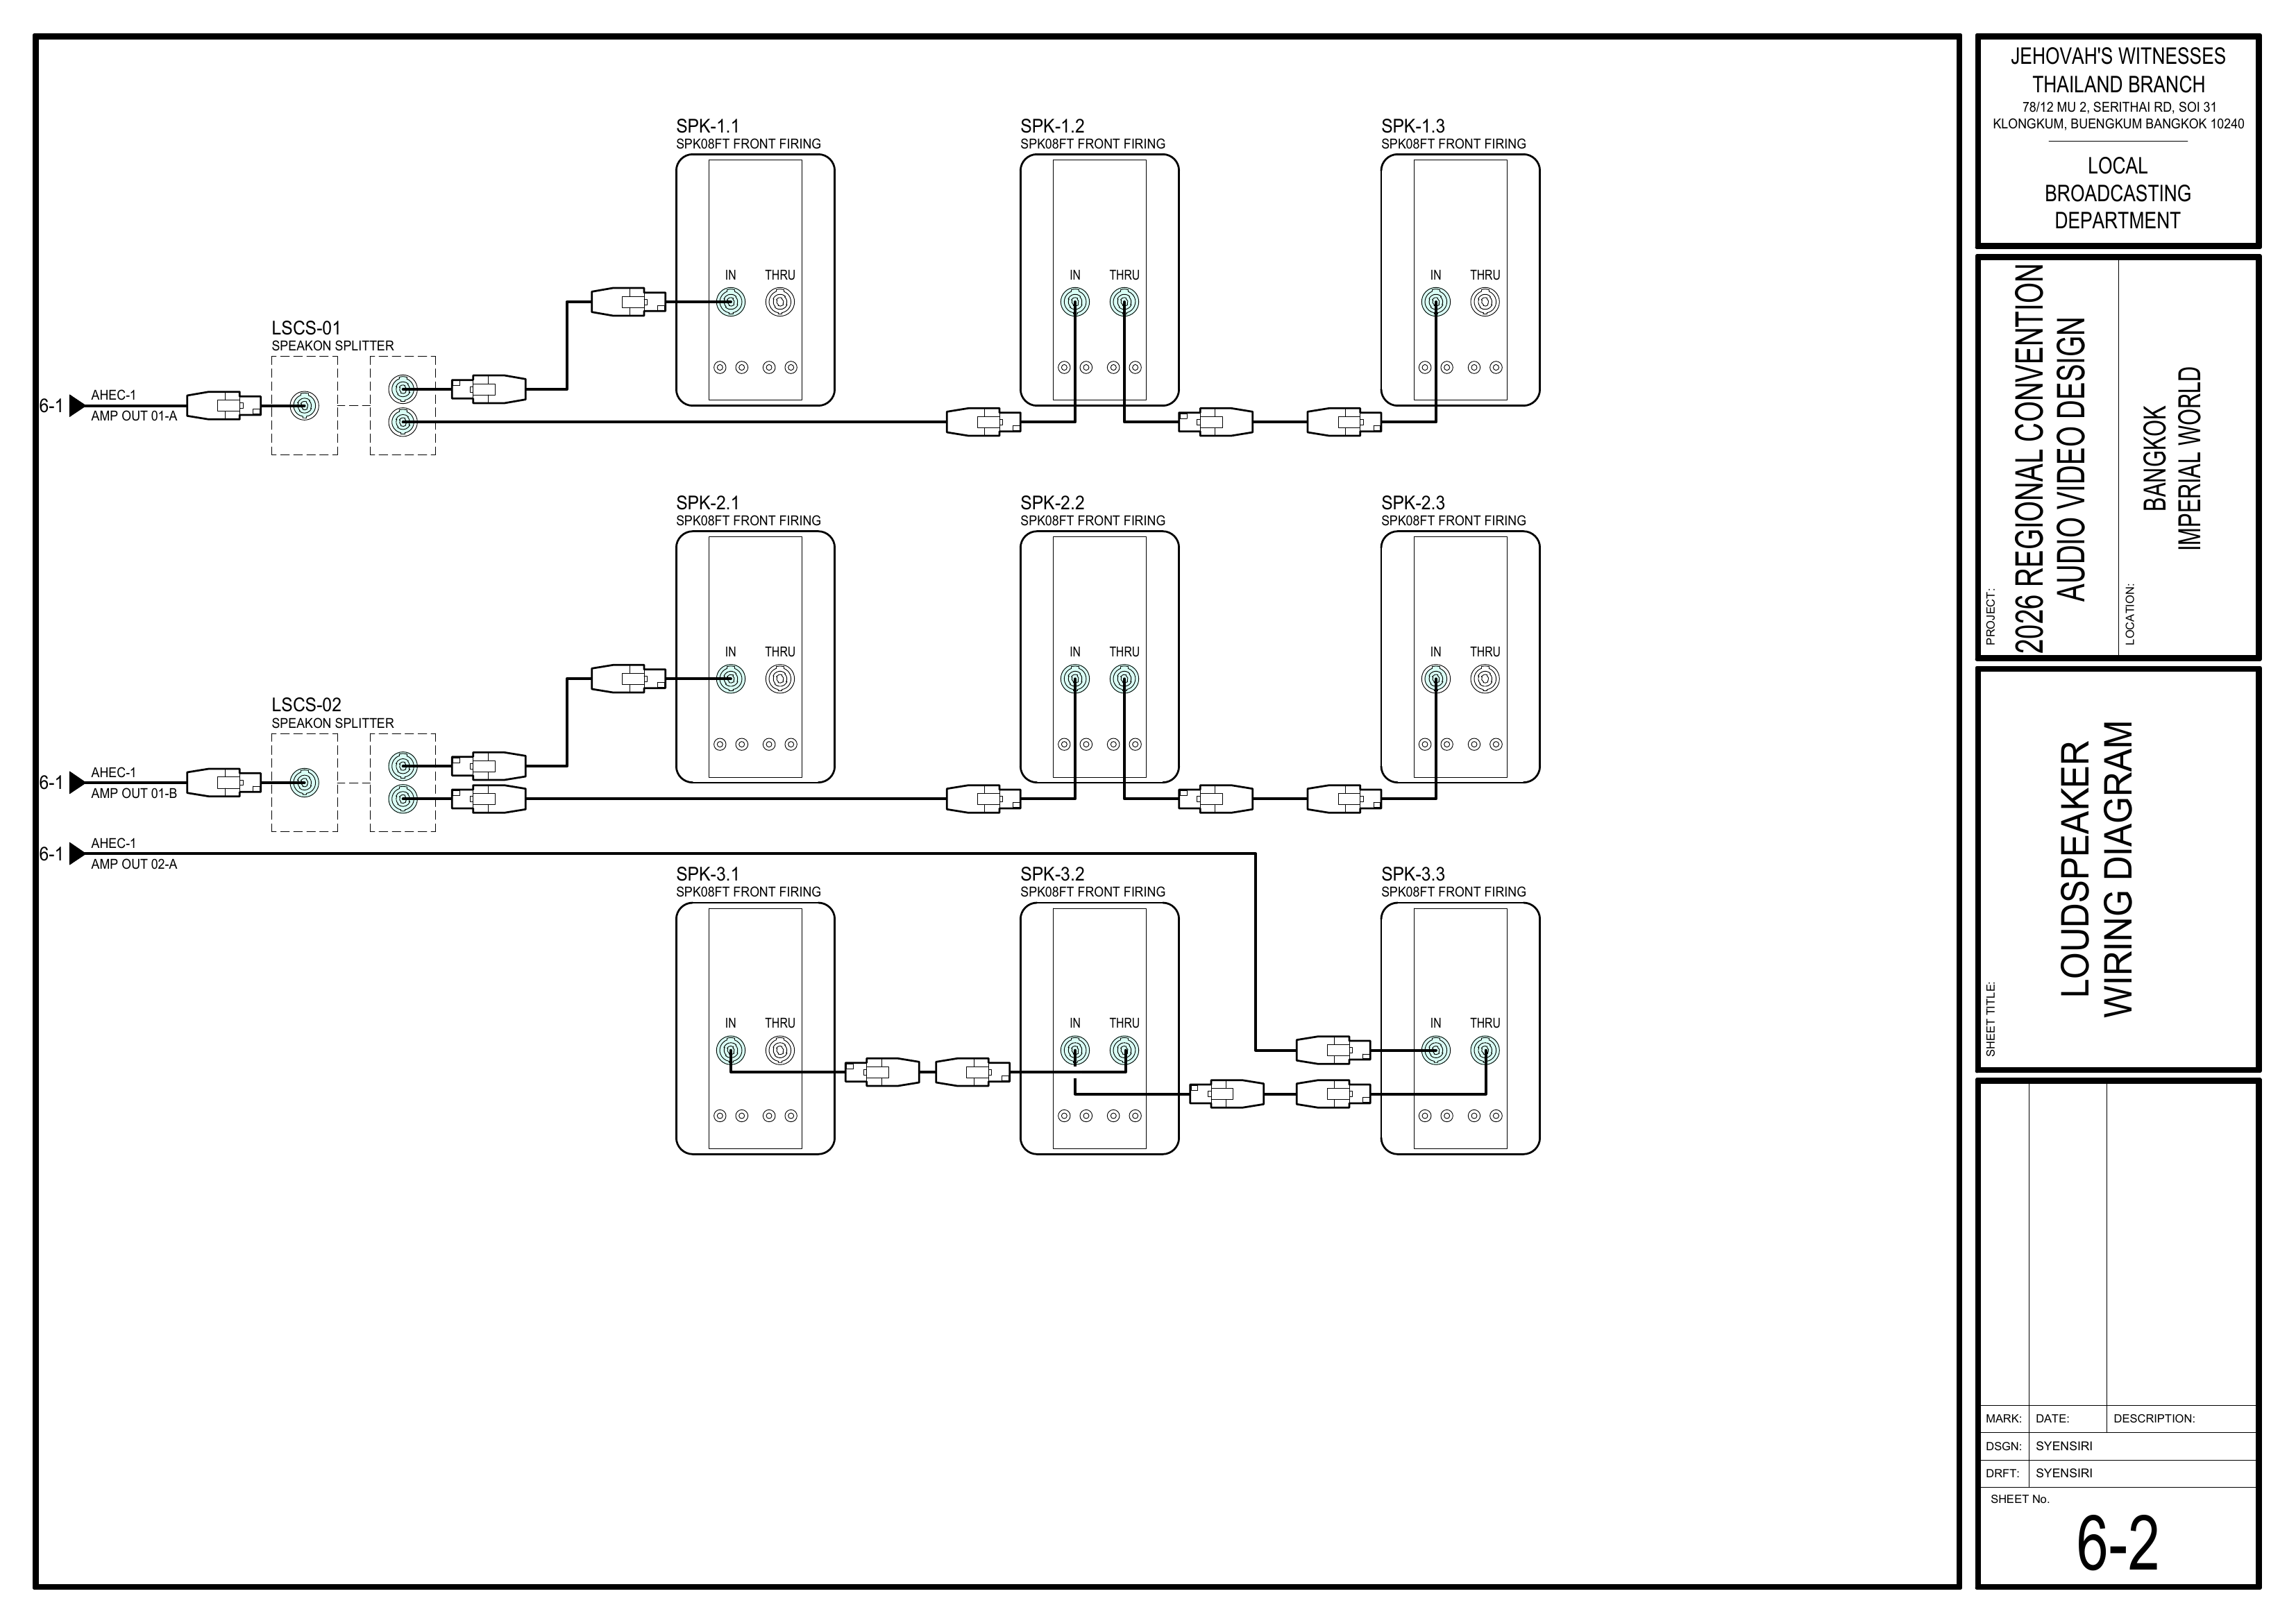
- 6-2 Loudspeaker Wiring Diagram
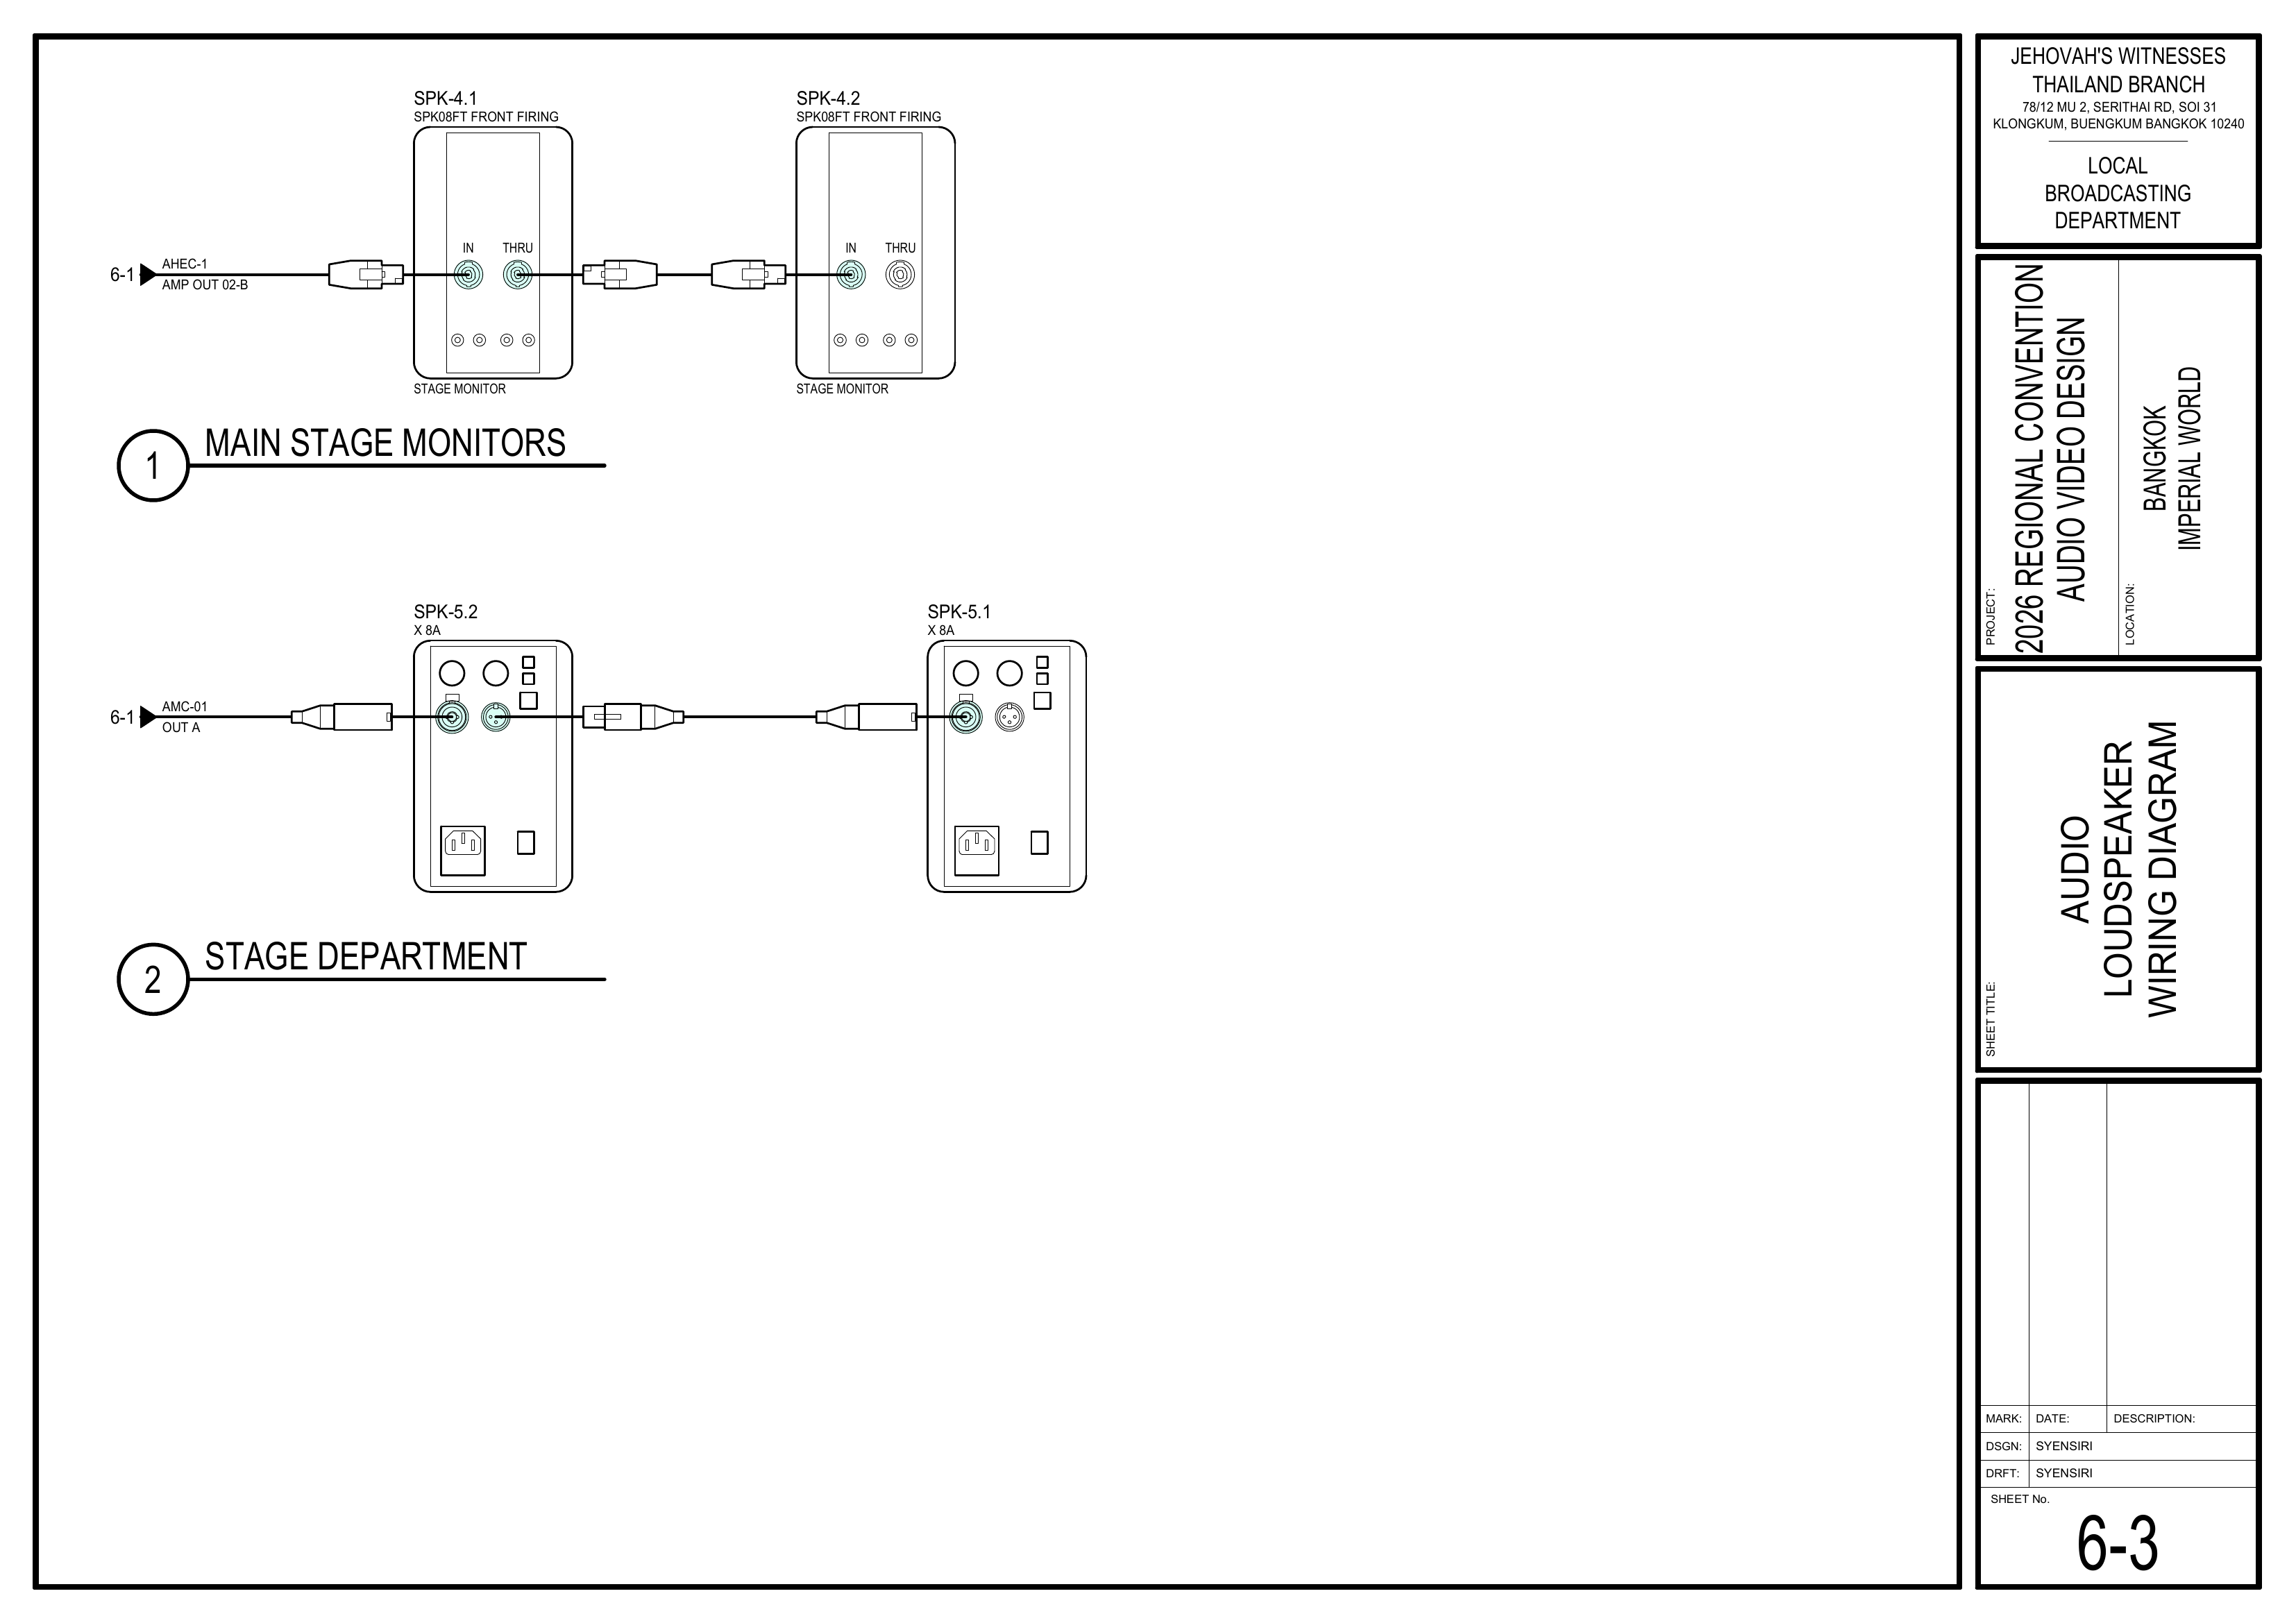
- 6-3 Audio Loudspeaker Wiring Diagram
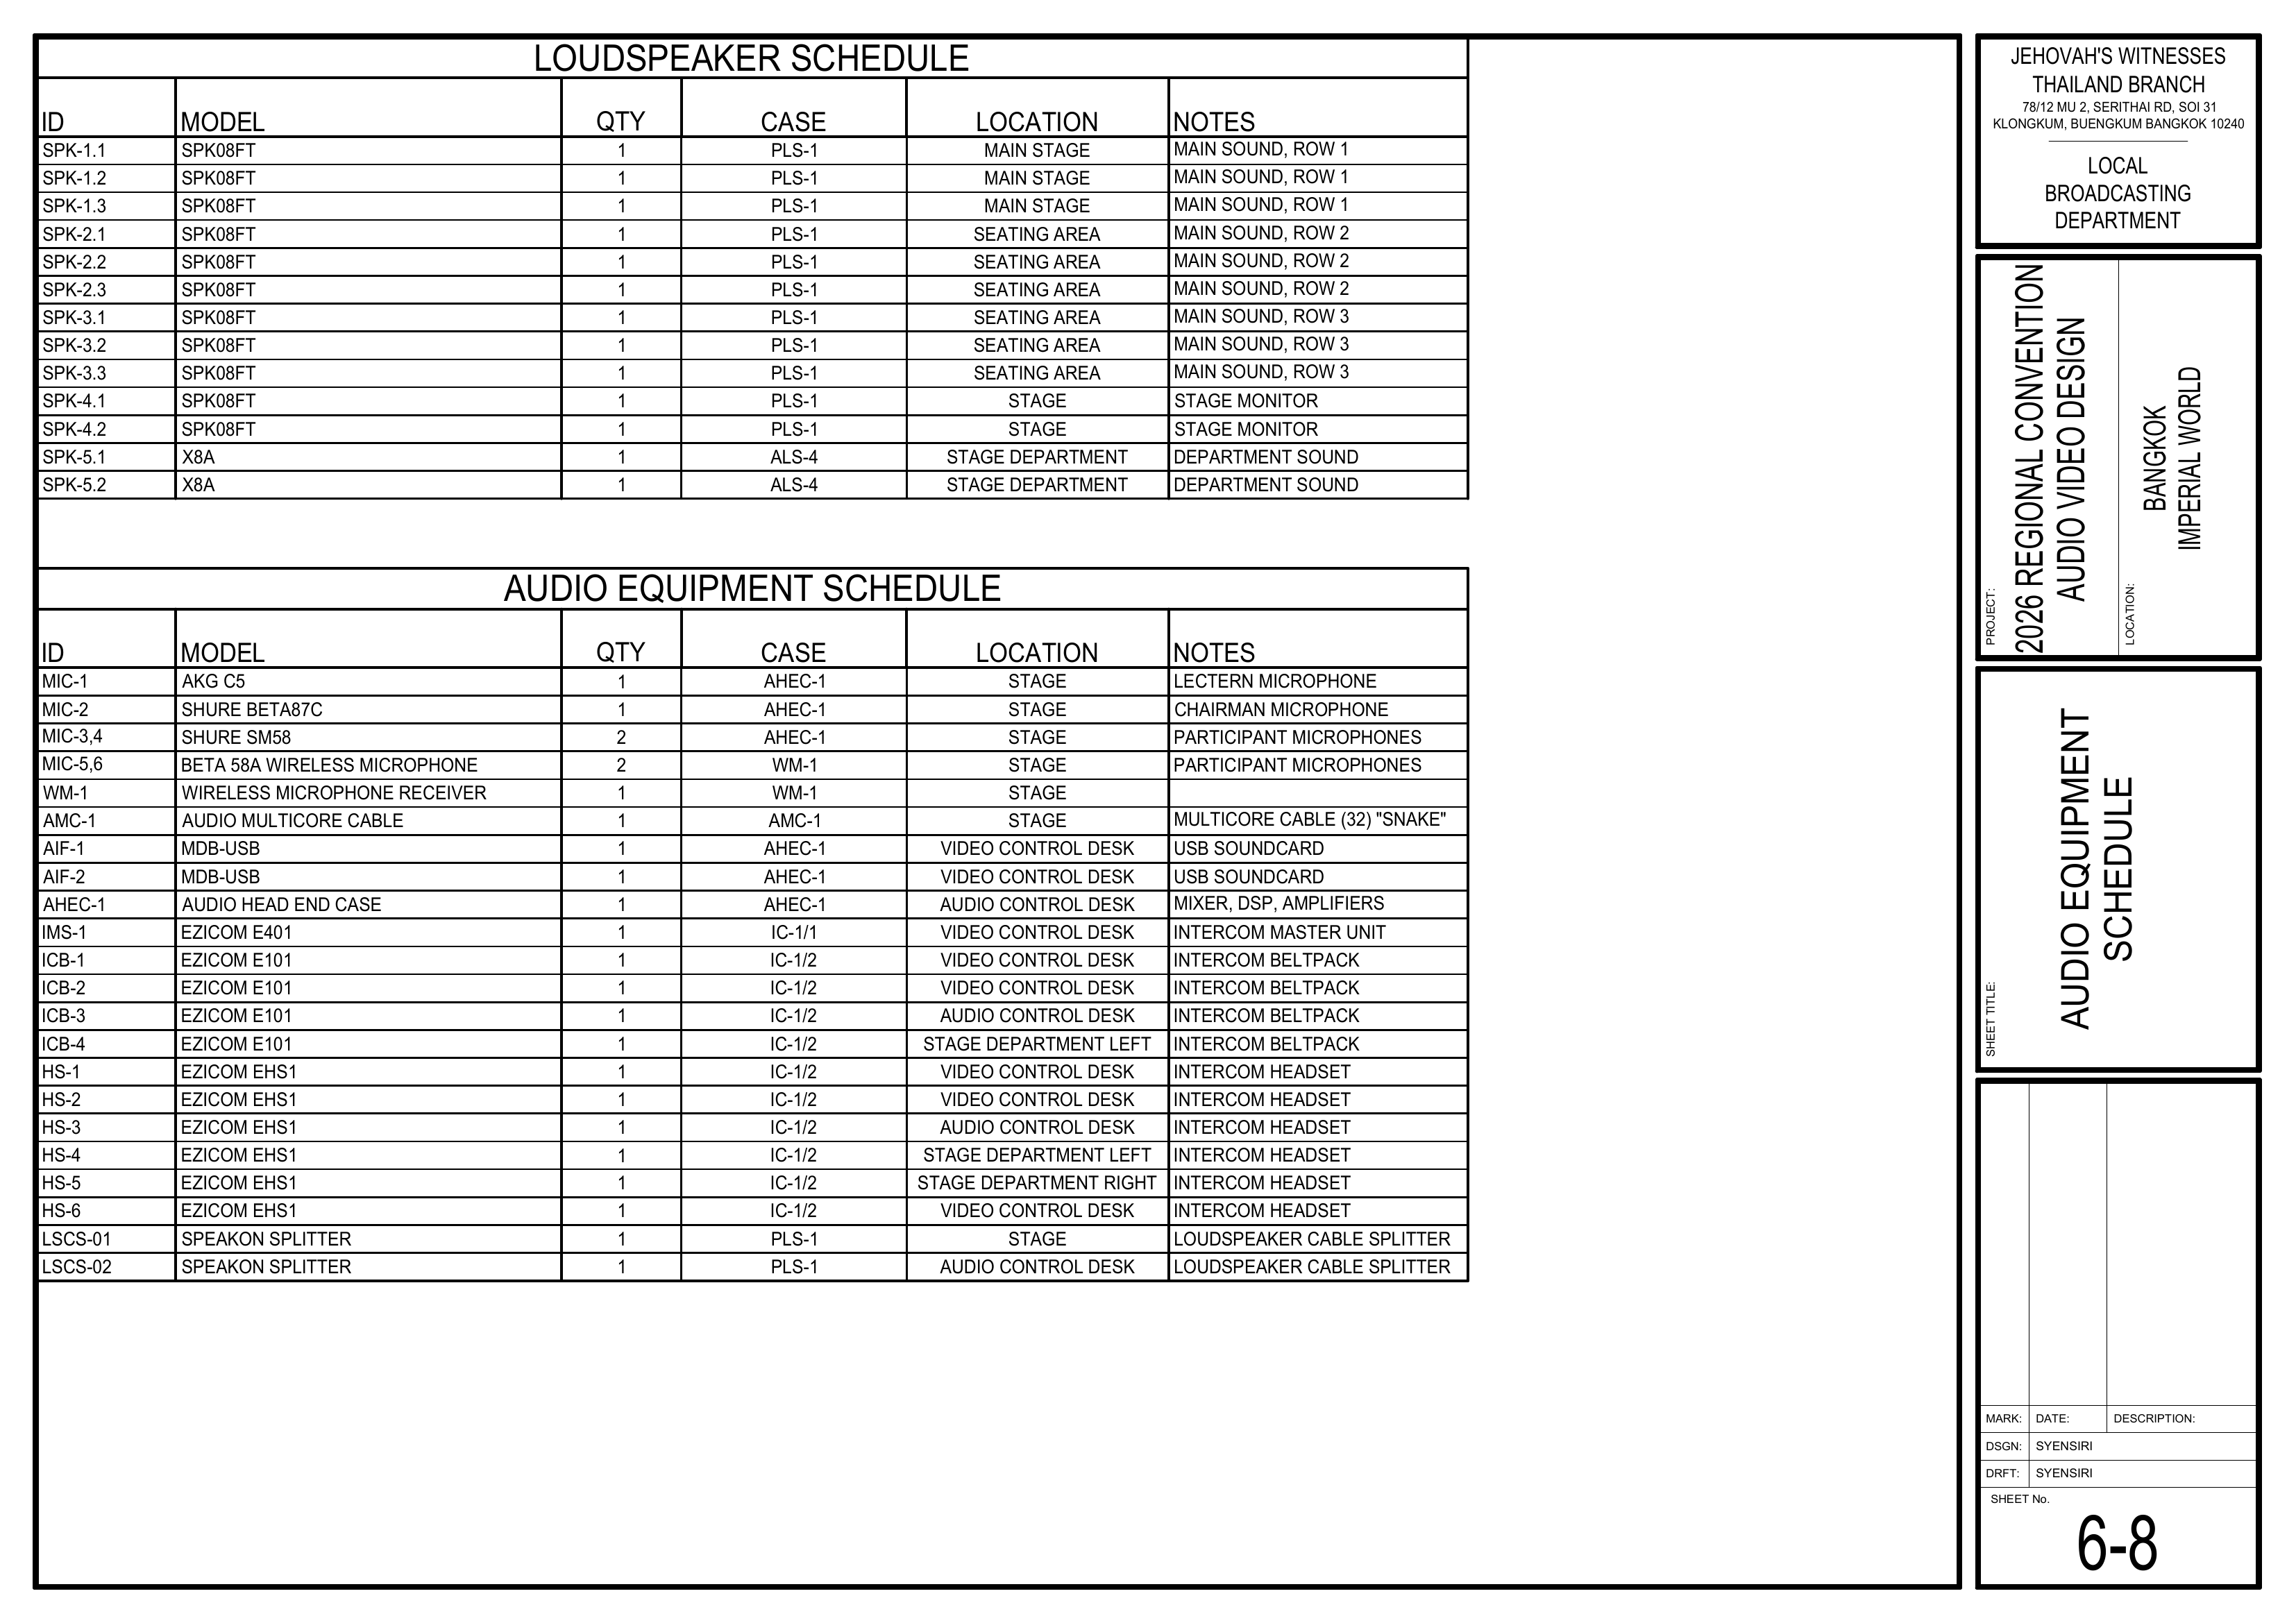
- 6-8 Audio Equipment Schedule
- Event Content List: Cases PLS-1, ALS-4, TP-1, SES-1
Required Equipment Cases
- PLS-1: Contains the SPK08FT passive loudspeakers used for groups 1-4 (main sound and stage monitors), plus Speakon splitters, cables, and extenders.
- ALS-4: Contains the TOPP Pro X-8A active loudspeakers used for group 5 (stage department).
- TP-1: Contains the adjustable elevator tripods to elevate all loudspeakers.
- SES-1: Contains heavy-duty 5kg sandbags to secure the tripods.
Loudspeaker & Splitter Schedule
From Page 6-8 Audio Equipment Schedule
| ID | Model | Qty | Case | Location | Notes |
|---|---|---|---|---|---|
| SPK-1.1, 1.2, 1.3 | SPK08FT | 3 | PLS-1 | Main Stage | Main sound, row 1 |
| SPK-2.1, 2.2, 2.3 | SPK08FT | 3 | PLS-1 | Seating Area | Main sound, row 2 |
| SPK-3.1, 3.2, 3.3 | SPK08FT | 3 | PLS-1 | Seating Area | Main sound, row 3 |
| SPK-4.1, 4.2 | SPK08FT | 2 | PLS-1 | Stage | Stage monitor |
| SPK-5.1, 5.2 | X8A | 2 | ALS-4 | Stage Department | Department sound |
| LSCS-01 | Speakon Splitter | 1 | PLS-1 | Stage | Loudspeaker cable splitter |
| LSCS-02 | Speakon Splitter | 1 | PLS-1 | Audio Control Desk | Loudspeaker cable splitter |
Setup Steps
1. Measure Distances
Schematics: Pages 1-1 Seating Layout Plan, 1-2 Audio Equipment Layout Plan
- First, measure chair distances according to the schematics, including speakers, stage, aisles, and seating sections.
🗺️ View Associated Schematics (Pages 1-1, 1-2)
2. Position Equipment
- Bring the loudspeaker cases (PLS-1, ALS-4) and the elevator tripods (TP-1) to the installation areas.
- Bring the 5kg heavy-duty sandbags (SES-1) to secure the tripods.
3. Install Loudspeaker Groups 1 to 5
Schematics: Pages 1-2 Audio Equipment Layout Plan, 4-1 Stage Area Equipment Layout, 6-8 Audio Equipment Schedule
- Install loudspeaker groups 1-5 according to the schematics and the table above. Groups 1, 2, and 3 (SPK08FT) are for the main sound; Group 4 (SPK08FT) is for stage monitors; Group 5 (X8A) is for department sound.
- Mount all loudspeakers on Tripod TP-1 with an approximate 5-degree downward tilt.
- Set the height of the loudspeakers to 2.5m, except for SPK-1.2, which should be set to 2.4m.
- Use the 5kg sandbags to secure the tripods.
🗺️ View Associated Schematics (Pages 1-2, 4-1, 6-8)
4. Connect Wiring
Schematics: Pages 6-2 Loudspeaker Wiring Diagram, 6-3 Audio Loudspeaker Wiring Diagram
- Connect the routed Speakon cables to Groups 1–4 and the XLR cables to the Group 5 active speakers.
- Attach the wiring before raising the speaker to the desired height.
🗺️ View Associated Schematics (Pages 6-2, 6-3)
Completion Checklist
- Distances measured
- Loudspeaker groups 1-5 installed
- Height set to 2.5m (SPK-1.2 at 2.4m)
- Downward tilt set to 5 degrees
- Tripods secured with sandbags
- Cables connected before raising
- Keyman inspection completed
Dismantling Procedure
- Wait for the department briefing and prayer 30 minutes after the program ends on Sunday before dismantling.
- Lower the tripods and disconnect the cables carefully.
- Gather all equipment and bring it to the designated area.
- Note for team leader: Use the Bill of Materials (BOM) to cross off every box or case before it is brought to the truck:
- PLS-1
- ALS-4
- TP-1
- SES-1
🇨🇳 中文说明
目的
根据图纸测量椅子距离,并安装观众区、讲台和会计/部门的 1-5 组扬声器。
参考资料
- 完整图纸: 📎 完整 PDF 文件
- 相关图纸:
- 1-1 座位布局图
- 1-2 音频设备布局图
- 4-1 舞台区域设备布局图
- 6-2 扬声器接线图
- 6-3 讲台及部门扬声器接线图
- 6-8 音频设备清单
- 大会设备清单: 设备箱 PLS-1, ALS-4, TP-1, SES-1
所需设备箱
- PLS-1: 包含用于 1-4 组(主音响和讲台监听)的 SPK08FT 被动扬声器,以及 Speakon 分配器、线缆和延长线。
- ALS-4: 包含用于第 5 组(讲台部门)的 TOPP Pro X-8A 有源扬声器。
- TP-1: 包含用于所有扬声器的可调节升降三脚架。
- SES-1: 包含用于固定三脚架的重型 5 公斤沙袋。
扬声器及分配器清单
摘自图纸 6-8 音频设备清单
| 编号 | 型号 | 数量 | 设备箱 | 位置 | 备注 |
|---|---|---|---|---|---|
| SPK-1.1, 1.2, 1.3 | SPK08FT | 3 | PLS-1 | 主讲台 | 主音响,第 1 排 |
| SPK-2.1, 2.2, 2.3 | SPK08FT | 3 | PLS-1 | 观众区 | 主音响,第 2 排 |
| SPK-3.1, 3.2, 3.3 | SPK08FT | 3 | PLS-1 | 观众区 | 主音响,第 3 排 |
| SPK-4.1, 4.2 | SPK08FT | 2 | PLS-1 | 讲台 | 讲台监听 |
| SPK-5.1, 5.2 | X8A | 2 | ALS-4 | 讲台部 | 部门音响 |
| LSCS-01 | Speakon 分配器 | 1 | PLS-1 | 讲台 | 扬声器线缆分配器 |
| LSCS-02 | Speakon 分配器 | 1 | PLS-1 | 音频控制台 | 扬声器线缆分配器 |
安装步骤
1. 测量距离
图纸:1-1 座位布局图、1-2 音频设备布局图
- 首先,根据图纸测量椅子距离,包括扬声器、讲台、通道和座位区域等。
🗺️ 查看相关图纸(图纸 1-1, 1-2)
2. 摆放设备
- 将扬声器箱(PLS-1, ALS-4)和三脚架 (TP-1) 移动到安装区域。
- 拿取 5 公斤重型沙袋 (SES-1) 来固定三脚架。
3. 安装 1 至 5 组扬声器
图纸:1-2 音频设备布局图、4-1 舞台区域设备布局图、6-8 音频设备清单
- 根据图纸和上表安装 1-5 组扬声器。1、2、3 组 (SPK08FT) 为主音响;第 4 组 (SPK08FT) 为讲台监听;第 5 组 (X8A) 为部门音响。
- 所有扬声器安装在 TP-1 三脚架上,并向下倾斜约 5 度。
- 扬声器高度设为 2.5 米,只有 SPK-1.2 须设为 2.4 米。
- 使用 5 公斤沙袋固定三脚架。
🗺️ 查看相关图纸(图纸 1-2, 4-1, 6-8)
4. 连接线缆
图纸:6-2 扬声器接线图、6-3 讲台及部门扬声器接线图
- 将已铺设的 Speakon 线缆连接到第 1–4 组扬声器,并将 XLR 音频线连接到第 5 组有源扬声器。线。
- 将电线连接好之后,才把扩音器升到需要的高度。
🗺️ 查看相关图纸(图纸 6-2, 6-3)
完成检查表
- 距离已测量
- 1-5 组扬声器已安装
- 高度已设为 2.5 米(SPK-1.2 为 2.4 米)
- 倾斜度已设为向下 5 度
- 三脚架已使用沙袋固定
- 升起前已连接线缆
- 负责人已检查确认
拆卸步骤
- 在星期日节目结束 30 分钟后,等待整个部门的简短会议和祷告后再开始拆除工作。
- 降下三脚架并小心拔除所有线缆。
- 收集所有设备并带到指定区域。
- 组长注意: 在将每个箱子或设备箱搬上卡车前,请使用物料清单 (BOM) 核对并划掉每一项:
- PLS-1
- ALS-4
- TP-1
- SES-1