
Loudspeakers
| Keyman 🔑 | Crew |
|---|---|
| Corey DeLoach | Melissa DeLoach; Mike Vigil; Lilia |
Your team safely places and aims the six passive loudspeakers. You also place the two stage monitors and the active speakers for the lobby and Accounting.
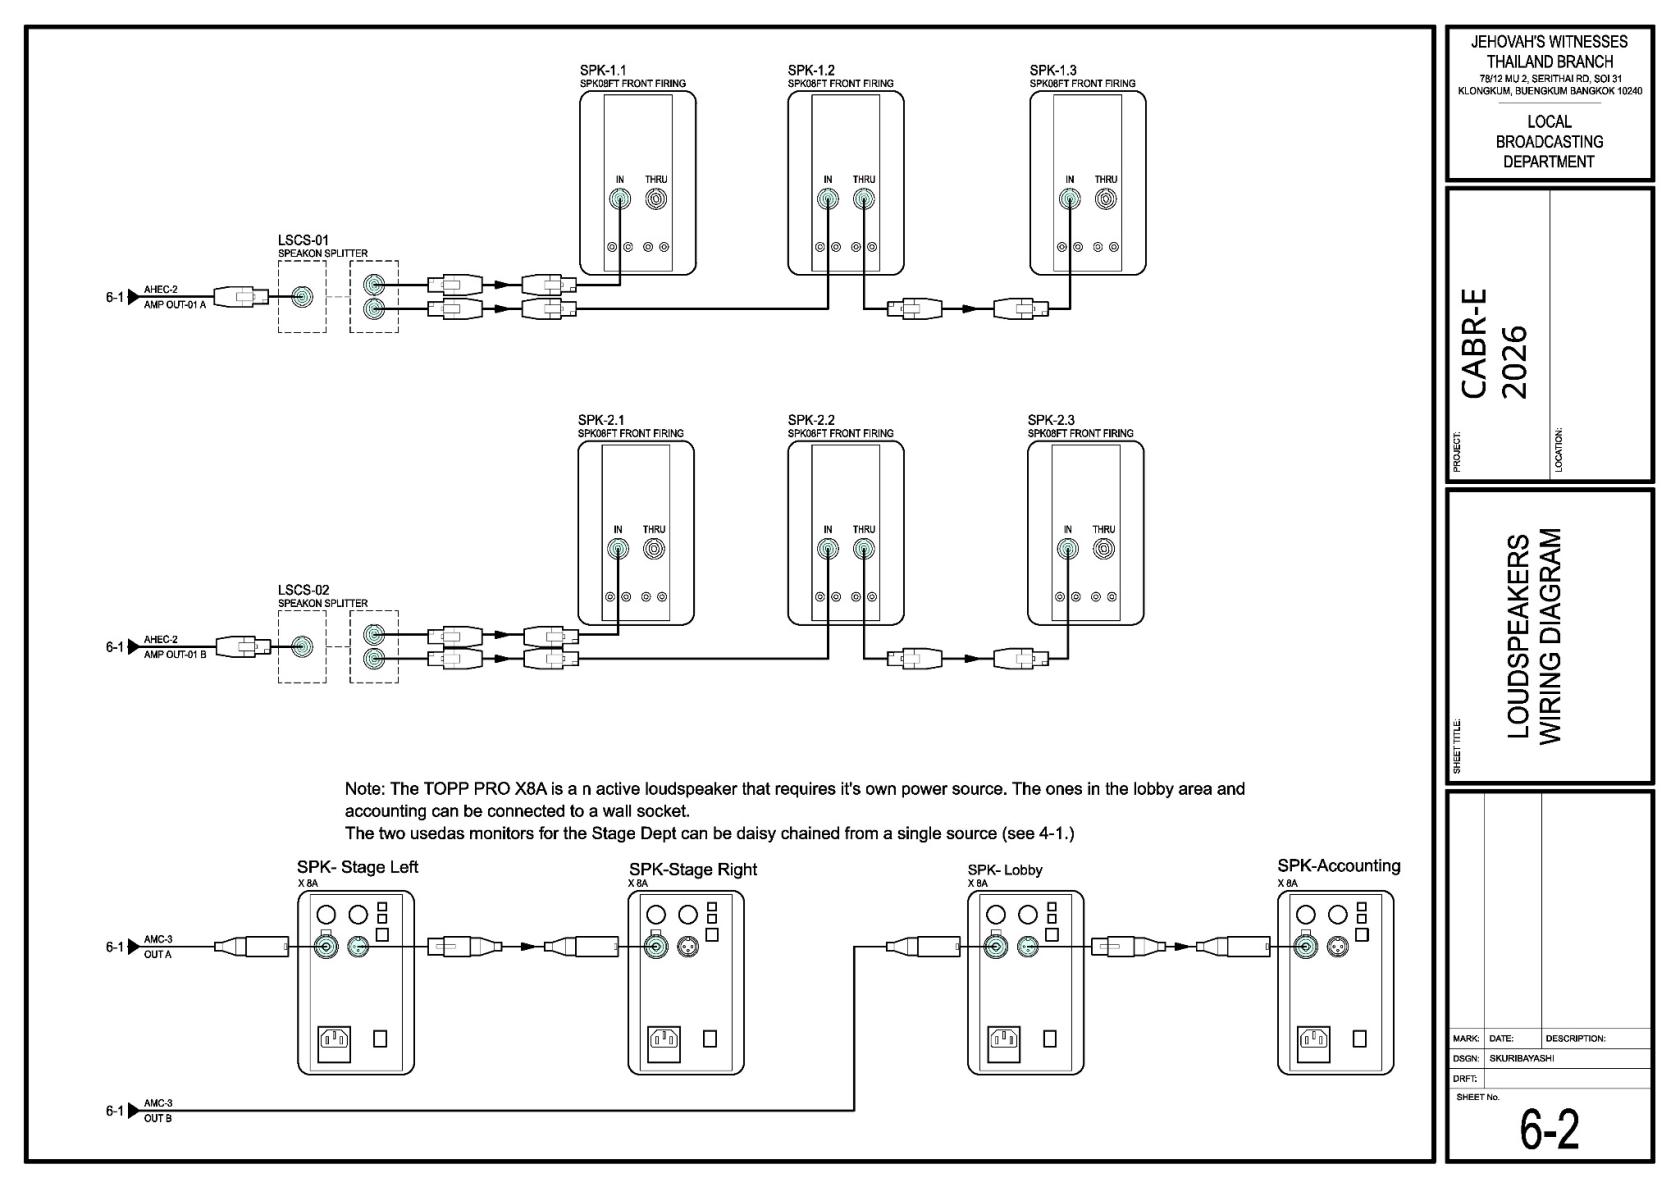
Before starting, meet Corey, review the team's DC-83, and open sheets 1-1, 4-1 and 6-2 in the schematics.
Safety:
Use two people to mount or remove a loudspeaker. Wear hard hats while working with raised speakers. Keep hands clear of moving parts. Connect the speakON loudspeaker cable before raising the speaker, and make sure every lock is secure before letting go.
What your team does
- With Corey, mark the six positions from sheet 1-1 and make sure no speaker or tripod blocks an exit.
- Set up each passive loudspeaker using the CO-160a quick guide below. Complete one loudspeaker as far as practical before moving to the next.
- Place the two stage monitors on the stage floor as sheet 4-1 shows. Agree the exact position with Stage.
- Leave the XLR and power connections easy to reach, and keep the cables out of participant walking paths.
- Confirm the XLR handoff with Audio Cabling and the power connection with Power before final placement.
- Place the lobby and Accounting speakers on stable surfaces near safe wall sockets. These active speakers do not use the passive-speaker tripods.
- Keep the XLR and power connections neat, clear of walkways, and away from wet areas.
- Confirm the final position with Audio Cabling and Power before testing.
- Test every speaker with the A/V Booth team. Walk the seating area with Alex and adjust only as directed.
Set up each passive loudspeaker — CO-160a quick guide
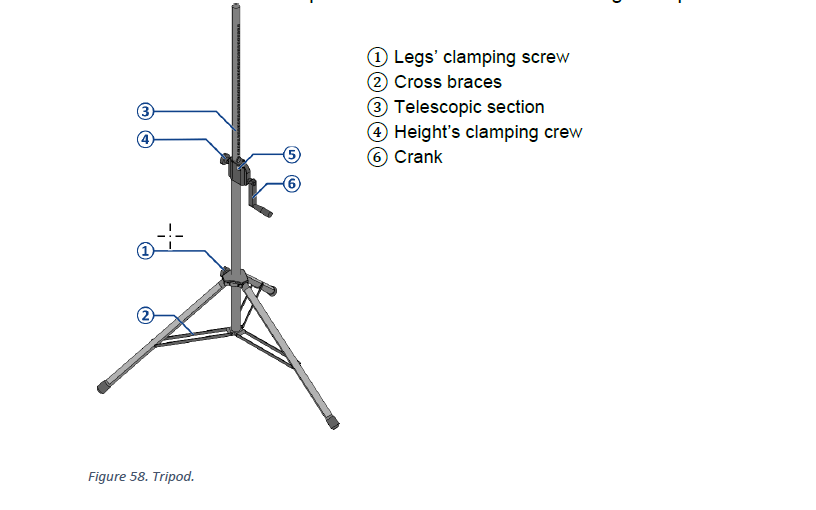
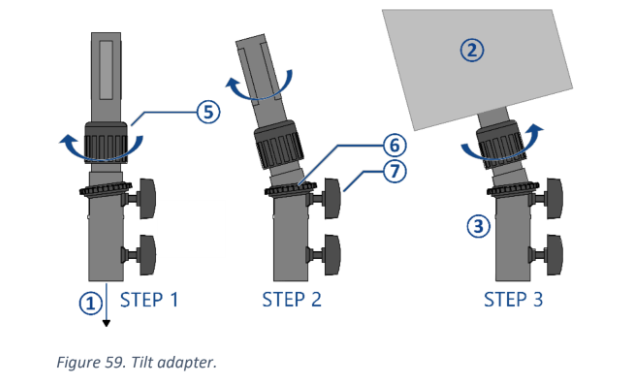
These steps come from CO-160a Chapter 3, Tripods (TP-1), pages 5–6, Figures 58–59. Use the current CABR-2026 drawings for the actual speaker position, height and aiming.
Current CABR-2026 Sheet 6-2 — loudspeaker wiring
1. Open and secure the tripod — Figure 58
- Put the tripod on an even, stable surface.
- Loosen the leg clamping screw ①. Open the legs until the cross braces ② are horizontal, then retighten the screw.
- Point one tripod leg in the direction the loudspeaker will tilt.
- Add the 5 kg sandbags Corey assigns.
📘 View CO-160a Figure 58 — TP-1 tripod
2. Mount and aim the loudspeaker — Figure 59
- Set the tilt adapter to about 5° downward and tighten the upper clamping screw ⑦.
- Turn lock ring ⑤ toward OPEN.
- Using two people, place the loudspeaker on the adapter.
- Keep the tilted loudspeaker above one tripod leg for stability.
- Turn lock ring ⑤ toward CLOSE until the loudspeaker is secure.
- Aim it according to the current CABR-2026 drawing.
📘 View CO-160a Figure 59 — tilt/angle adapter
3. Connect the speakON cable before raising
- Confirm Audio Cabling has brought the correct labelled speakON cable.
- Connect the speakON cable before raising the loudspeaker.
- Leave enough slack so raising the tripod does not pull on the speakON connector.
- Keep the speakON cable clear of the tripod mechanism and walkways.
- If the speakON cable is not ready, leave the tripod lowered and return to it later.
4. Raise and lock the tripod — Figure 58
- Loosen the height clamping screw ④.
- Hold button ⑤ while turning crank ⑥ to raise telescopic section ③.
- Raise the loudspeaker to the height in the table below.
- Release button ⑤ and continue turning the crank until the safety pin clicks into place.
- Tighten height clamping screw ④.
- Check the tripod, adapter, loudspeaker, sandbags, speakON cable and all locks before moving away.
For the keyman
| Group | Position and height | Aim |
|---|---|---|
| Front: SPK-1.1, 1.2, 1.3 | About 4 m from the first row; normally 2.5 m high, with 1.2 at 2.4 m | Toward sections A, B and C |
| Rear: SPK-2.1, 2.2, 2.3 | About 3.5 m from the first row; 2.5 m high | Toward sections D, E and F |
All six passive speakers use about 5° downward tilt. If a raised speaker is above a walkway, keep at least 2.1 m clear underneath or use a barrier.
The PLS-1, TP-1 and ALS-4 cases are heavy and must be rolled with enough helpers. Sunday teardown assignments will be added later; do not lower any speaker until the audience has left, power is off, and the teardown briefing is finished. When dismantling, lower the tripod completely before removing the loudspeaker, and use two people to lift it off.