
Audio Cabling Setup / 音频线缆安装
🎤 Audio Cabling Team / 音频布线组
| Team / 小组 | Members / 成员 |
|---|---|
| Audio Cabling / 音频布线安装 | • Prasert🔑 • Zabrina 柏莉娜 • Siiri |
🇬🇧 English Instructions
Purpose
Install, protect, and label all audio cabling according to the schematics before system commissioning.
⚠️ Safety & Installation Notes
• Keep walkways clear.
• Protect all cables crossing walkways.
• Confirm routing before securing cables.
• Installation Note: When putting carpet covers down, tape one side only. Tape the other side once installation is finished.
Required References
- Full Drawing Set: 📎 Complete PDF
- Event Content List: Cases AMC-1, ASC-01, CPS-1, CPS-3
Required Equipment Cases
- AMC-1: Contains a 60 m audio multicore cable (also known as a snake cable) on a reel.
- ASC-01: Contains XLR cables (5m, 10m, and 20m lengths).
- CPS-1: Contains 10x 3-channel plastic flap floor cable protectors and 10x rubber mats.
- CPS-3: Contains carpet strips for covering cables.
Setup Steps
1. Install the Audio Multicore Cable
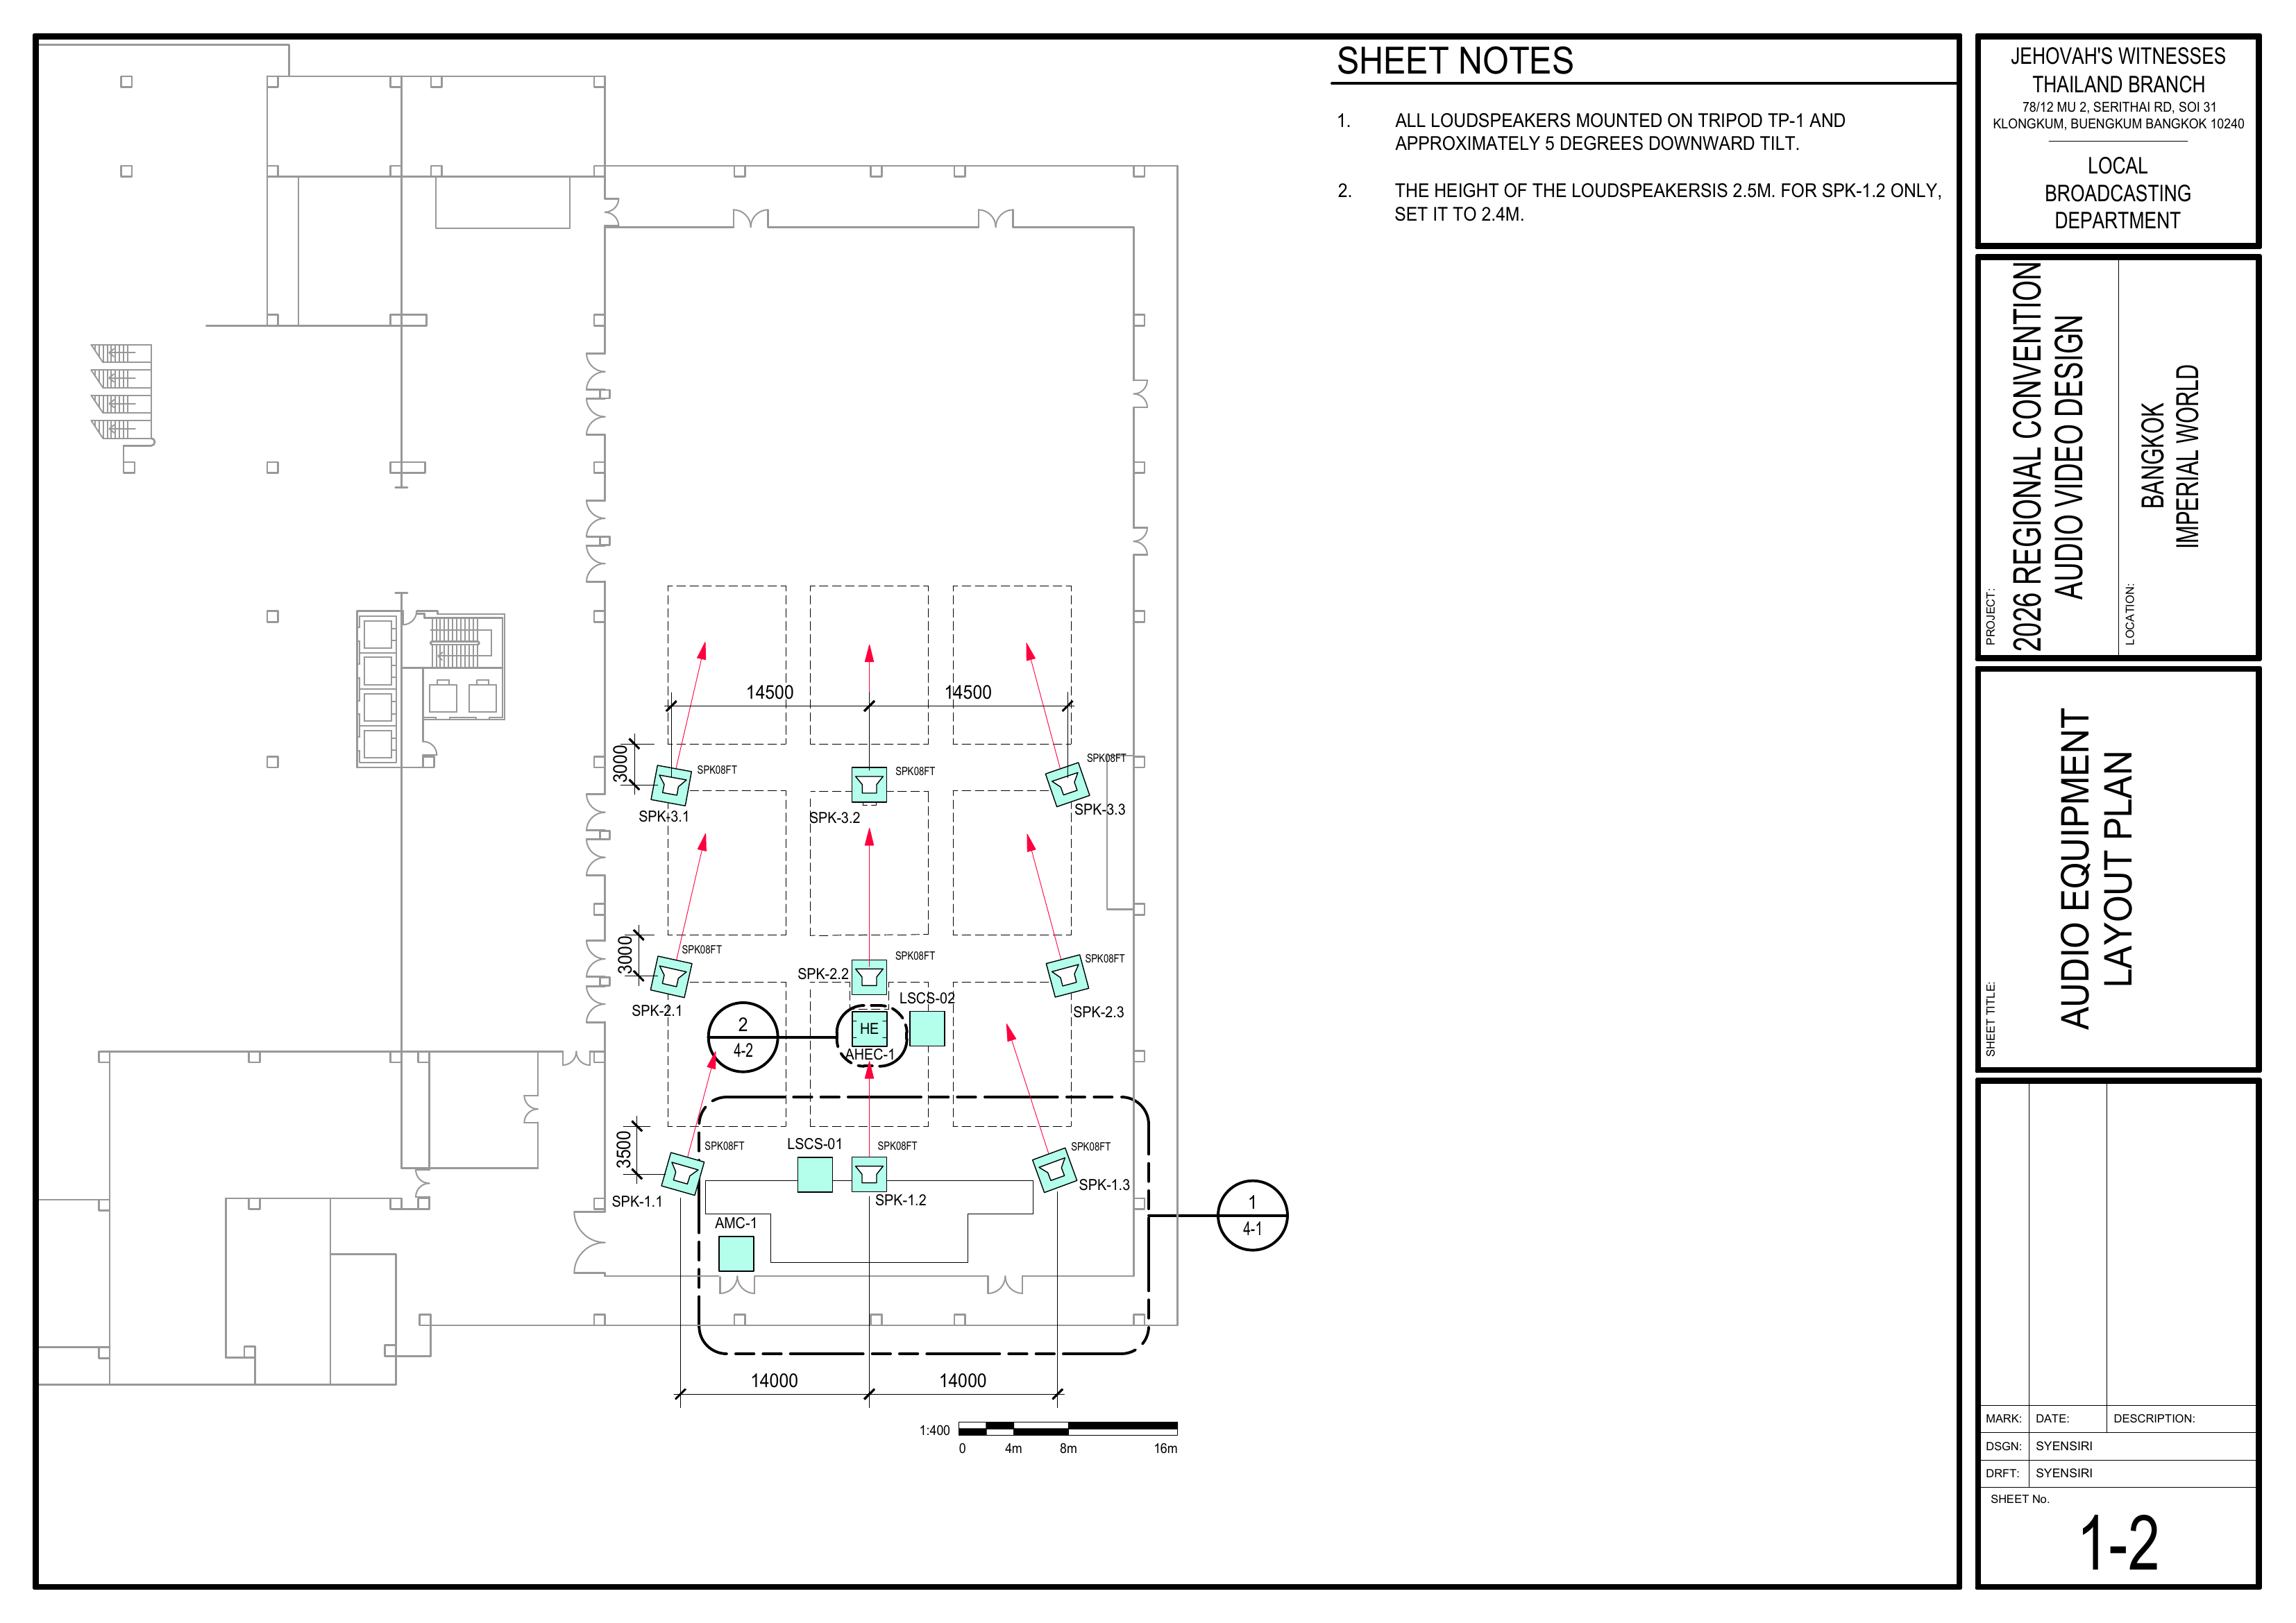
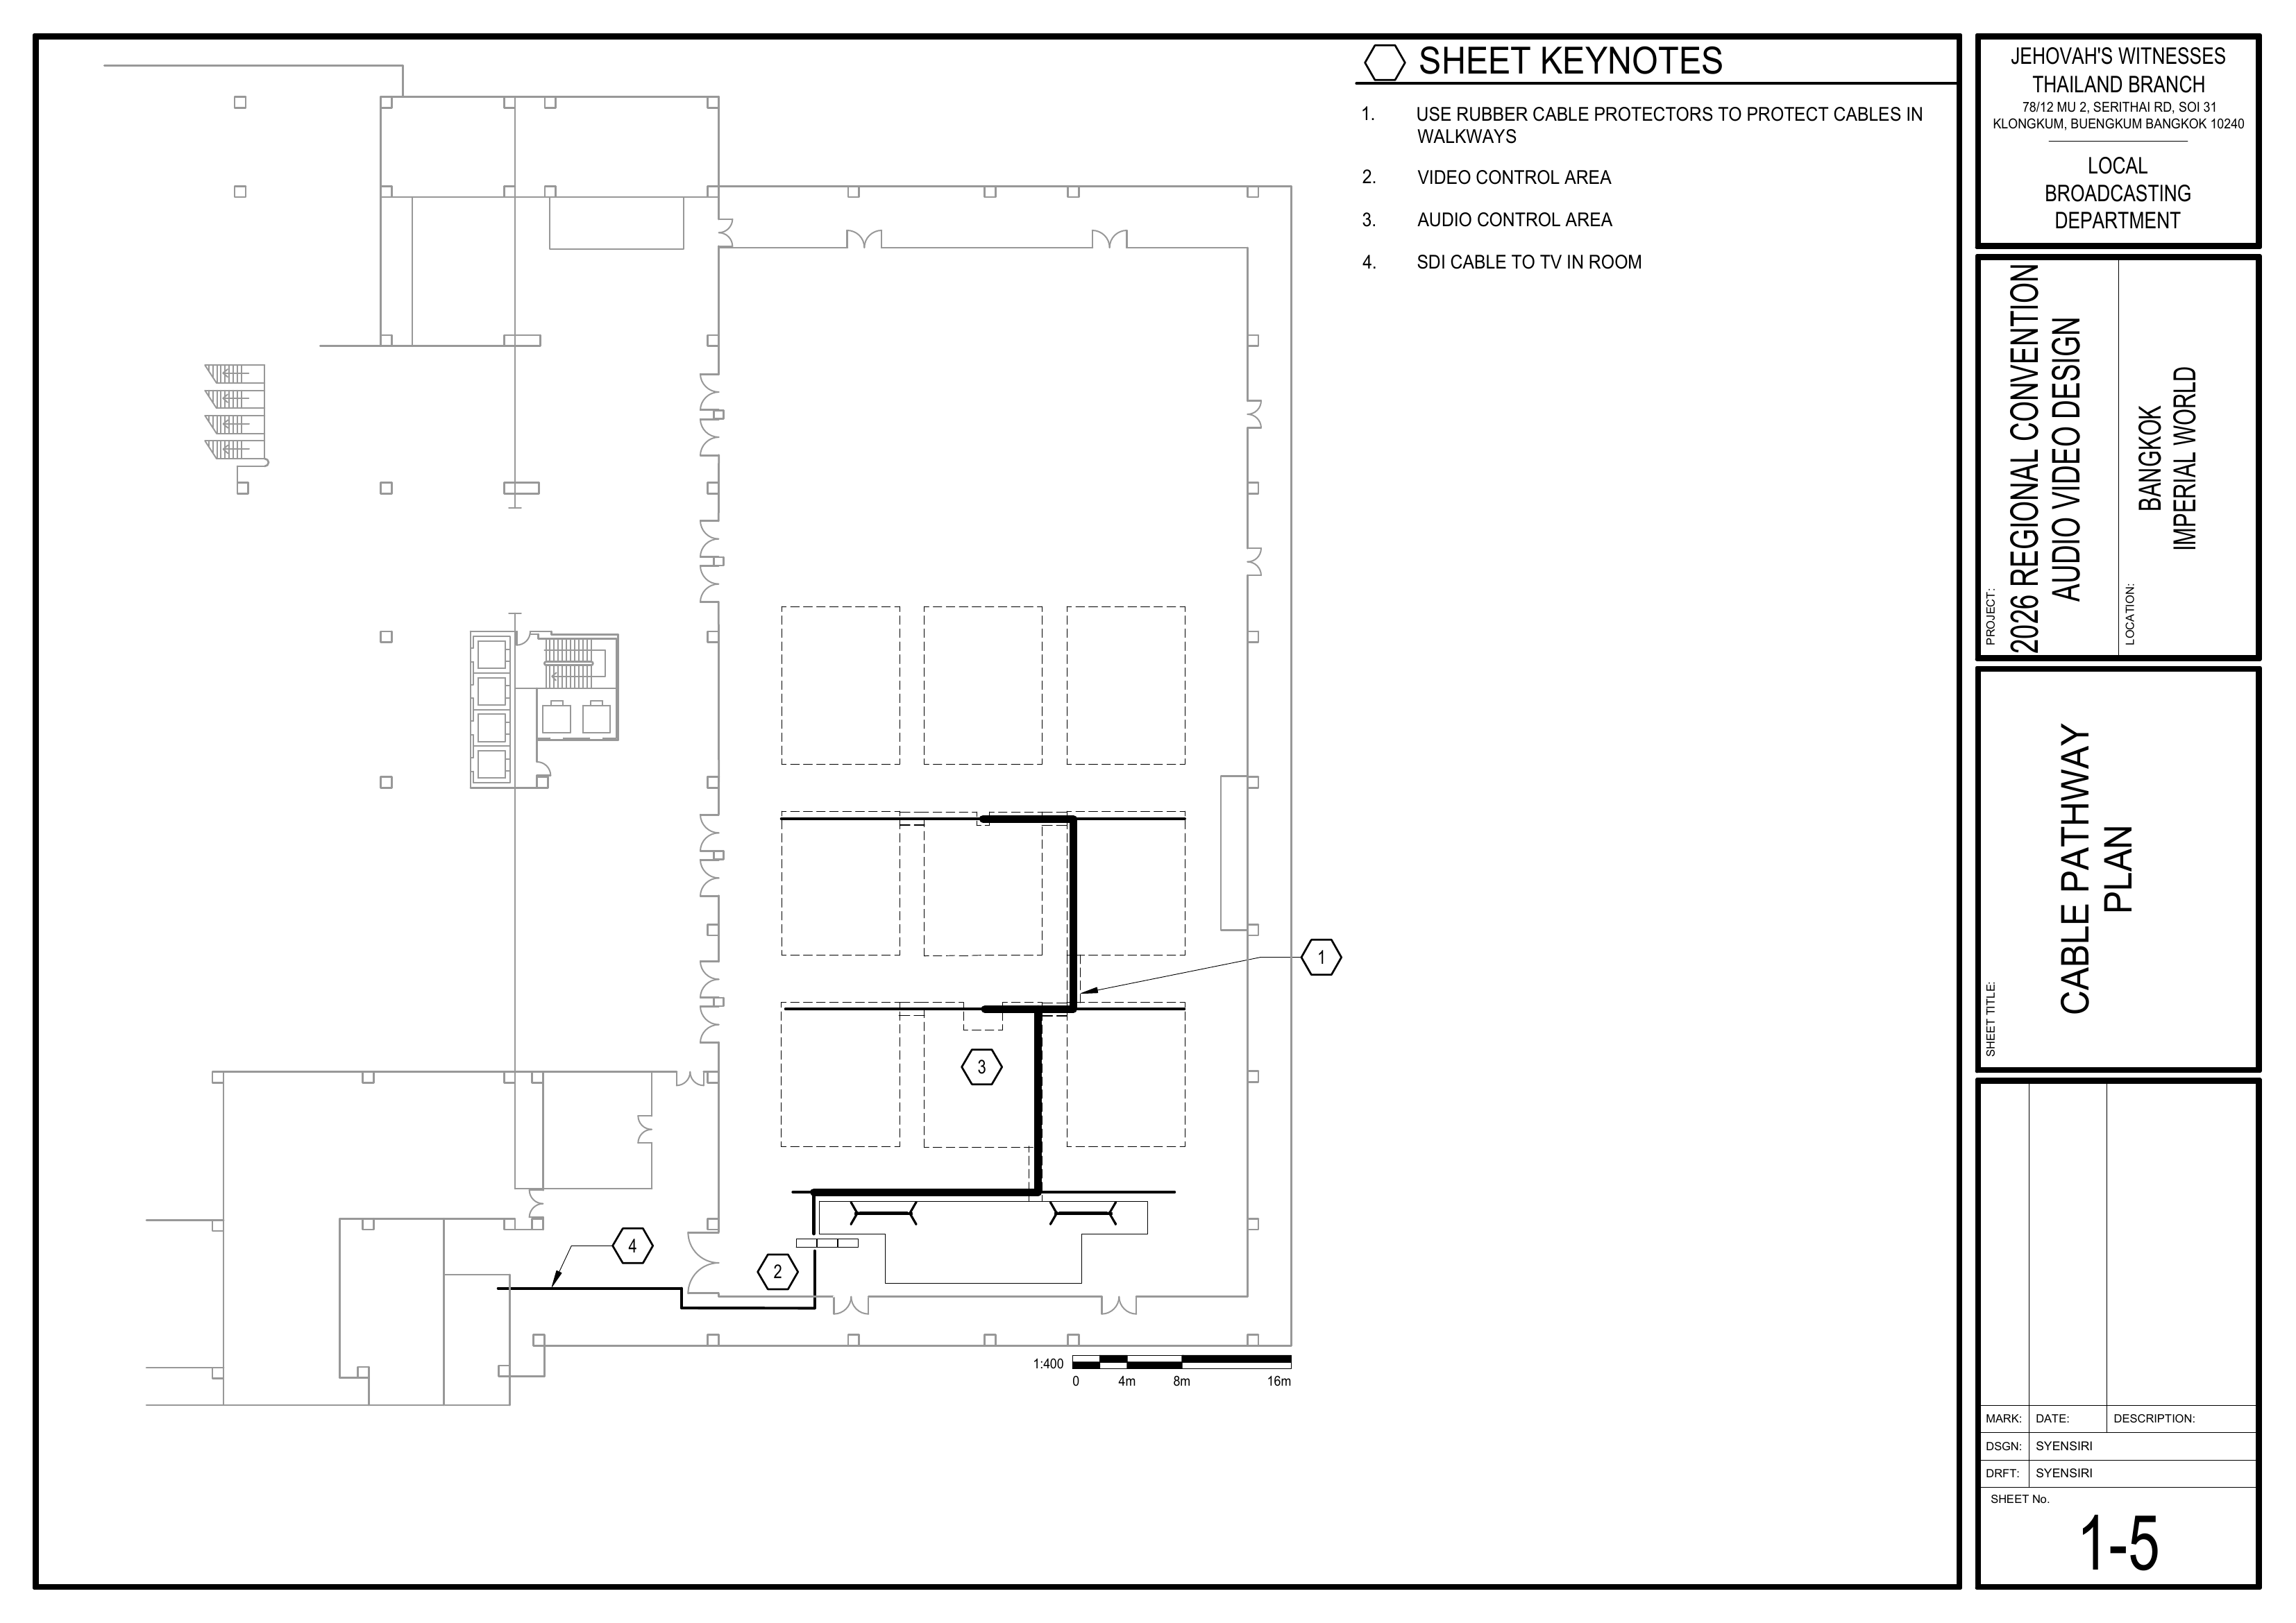
Schematics: Pages 1-2 Audio Equipment Layout Plan and 1-5 Cable Pathway Plan
- Route the audio multicore cable (AMC-1), also known as the snake cable, according to the schematics.
- Begin at the AMC-1 starting position at front stage left (p. 1-2), near the Video Control Area, between [2] and [3] (p. 1-5).
🗺️ View AMC-1 Location and Cable Route (Pages 1-2 and 1-5)
2. Install Speaker Cables
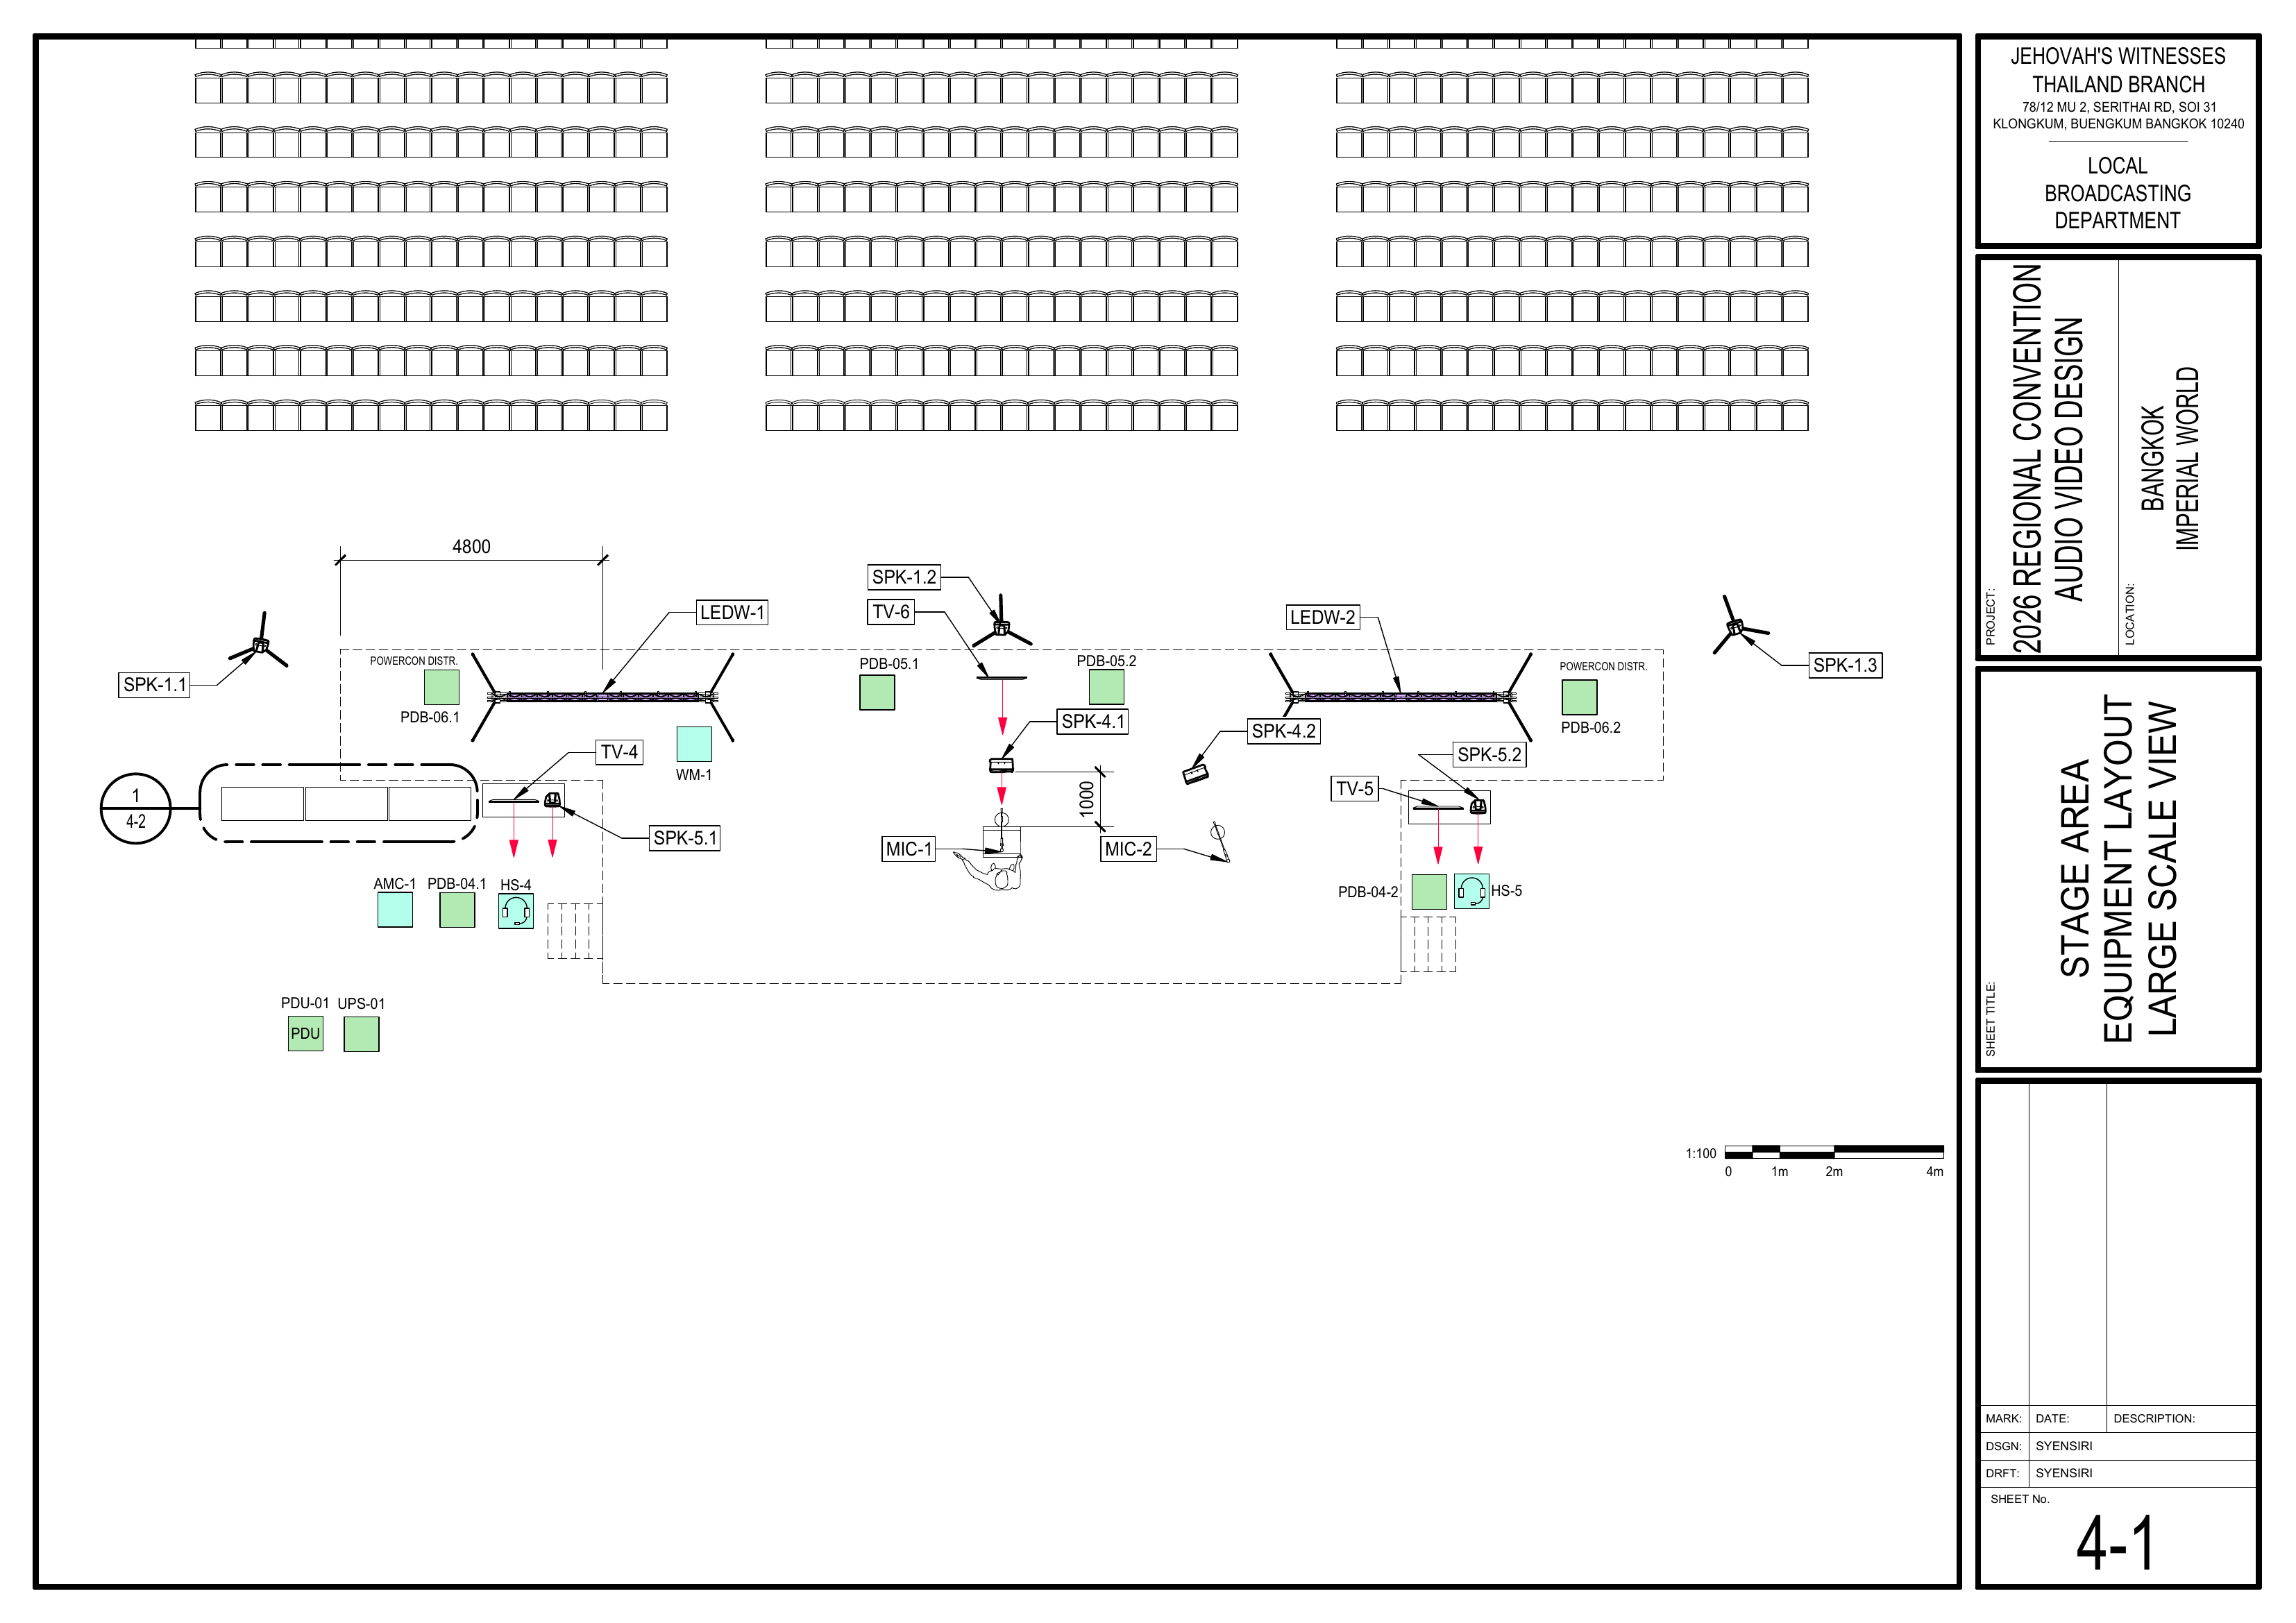
Schematics: Pages 1-2 Audio Equipment Layout Plan, 1-5 Cable Pathway Plan, 4-1 Stage Area Equipment Layout
- Route all loudspeaker cables according to the schematics: Speakon cables for Groups 1–4 and XLR cables from ASC-01 for Group 5. Verify the cable labels before routing.
🗺️ View Associated Schematics (Pages 1-2, 1-5, 4-1)
3. Protect Cabling
Schematics: Pages 1-5 Cable Pathway Plan, 4-1 Stage Area Equipment Layout
- Use tape, carpet covers, and floor cable channels (rubber covers) where required to cover and protect cables. Ensure all walkways remain safe. Use cable channels when crossing a walkway, and carpet covers for cables under chairs.
🗺️ View Cable Protection Schematics (Pages 1-5, 4-1)
Completion Checklist
- Audio multicore cable (AMC-1) installed
- Speaker cables installed (Groups 1-4)
- Routing matches schematics
- Cables protected (tape and covers secured)
- Walkways safe
- Keyman inspection completed
Dismantling Procedure
- Wait for the department briefing and prayer 30 minutes after the program ends on Sunday before dismantling.
- Gather all audio cabling and bring it to the designated area.
- Remove carpet covers and floor channels. Gather all rugs used to hold down cabling too.
- Confirm no cables remain in the seating area.
- Note for team leader: Use the Bill of Materials (BOM) to cross off every box or case before it is brought to the truck:
- AMC-1
- ASC-01
- CPS-1
- CPS-3
🇨🇳 中文说明
目的
根据图纸安装、保护并标识所有音频线缆,为系统调试做好准备。
⚠️ 安全与安装提示
• 保持通道畅通。
• 所有经过通道的线缆都必须加以保护。
• 固定线缆前确认走线路径。
• 安装提示: 铺设地毯压线盖时,先只用胶带固定一侧。等整体安装完成后再固定另一侧。
参考资料
- 完整图纸: 📎 完整 PDF 文件
- 大会设备清单: 设备箱 AMC-1, ASC-01, CPS-1, CPS-3
所需设备箱
- AMC-1: 包含一条安装在线盘上的 60 米音频多芯线缆(也称“蛇线”)。
- ASC-01: 包含 XLR 音频线缆(5 米、10 米和 20 米长度)。
- CPS-1: 包含 10 个 3 槽塑料地面线缆保护盖板和 10 个橡胶垫。
- CPS-3: 包含用于保护线缆的地毯压线条。
安装步骤
1. 铺设音频多芯线缆
图纸:1-2 音频设备布局图和 1-5 电缆路径图
- 按照图纸铺设音频多芯线缆(AMC-1,也称“蛇线”)。
- 从讲台前区左侧、靠近视频控制区的 AMC-1 起点开始铺设。该位置位于 [2] 和 [3] 之间。
🗺️ 查看 AMC-1 起点及线缆路线(图纸 1-2 和 1-5)
2. 铺设扬声器线缆
图纸:1-2 音频设备布局图、1-5 电缆路径图、4-1 舞台区域设备布局图
- 按照图纸铺设所有扬声器线缆:第 1–4 组使用 Speakon 线缆,第 5 组使用 ASC-01 设备箱中的 XLR 音频线。铺设前确认线缆标签正确。
🗺️ 查看相关图纸(图纸 1-2, 1-5, 4-1)
3. 保护线缆
图纸:1-5 电缆路径图、4-1 舞台区域设备布局图
- 根据需要使用胶带、地毯和线缆盖板覆盖并保护线缆。确保所有通道保持安全畅通。线缆穿越通道时必须使用橡胶过线槽进行保护,椅子下方使用地毯压线盖。
🗺️ 查看线缆保护相关图纸(图纸 1-5, 4-1)
完成检查表
- 音频多芯线缆(AMC-1)已铺设
- 第 1-4 组扬声器线缆已铺设
- 走线符合图纸
- 线缆已保护(胶带和盖板已固定)
- 通道安全
- 负责人已检查确认
拆卸步骤
- 在星期日节目结束 30 分钟后,等待整个部门的简短会议和祷告后再开始拆除工作。
- 收集所有音频线缆并带到指定集合区域。
- 移除地毯覆盖物和地面线槽。收集所有用于固定线缆的地毯。
- 确认座位区域没有遗留线缆。
- 组长注意: 在将每个箱子或设备箱搬上卡车前,请使用物料清单 (BOM) 核对并划掉每一项:
- AMC-1
- ASC-01
- CPS-1
- CPS-3